Author: KD2WWU

  • WHY AMATEUR RADIO?

      There are several compelling reasons why people choose to get into ham radio:

    1. Personal Enjoyment and Hobby: Many people find operating ham radio to be a fascinating hobby. It offers opportunities to communicate with people around the world, experiment with different modes of communication (voice, digital, Morse code, etc.), and participate in contests and events.

    2. Emergency Communication: Ham radio operators often play a crucial role in emergency communication. During disasters when other forms of communication may fail, hams can provide a lifeline for emergency responders, communities, and individuals in need. They are trained to handle emergency traffic efficiently and reliably.

    3. Technical Learning: Ham radio provides a hands-on way to learn about radio communication technology, electronics, antennas, propagation (how radio waves travel), and more. It’s a practical way to apply theoretical knowledge in a real-world setting.

    4. Community and Social Connections: Ham radio enthusiasts form a global community of like-minded individuals. They often participate in clubs, nets (regular on-air meetings), and events, fostering friendships and mentorship opportunities across generations and cultures.

    5. Public Service: Many hams engage in public service activities, such as providing communications support for marathons, parades, and other community events. They volunteer their skills and equipment to assist in logistics, safety, and coordination.

    6. Global Connectivity: Ham radio allows communication without reliance on internet infrastructure or commercial networks. This independence can be valuable in remote or isolated areas, during travel, or in regions where communication infrastructure is unreliable or unavailable.

    7. Experimentation and Innovation: Hams are encouraged to experiment with new technologies and techniques. This spirit of innovation has led to advancements in radio technology and communication protocols over the years.

    8. Personal Development: Operating ham radio can enhance skills such as problem-solving, communication, and adaptability. It challenges operators to think critically and make decisions quickly, particularly in dynamic conditions like contesting or emergency situations.

    9. Learning and Teaching: Many hams enjoy sharing their knowledge and mentoring newcomers to the hobby. This fosters a culture of continuous learning and passing on skills to future generations.

    Overall, ham radio offers a unique blend of personal enjoyment, technical exploration, community service, and global connectivity. Whether for hobbyist reasons, public service, or personal growth, ham radio continues to attract individuals who appreciate its versatility and enduring appeal.

    73,

    KD2WWU

  • HOW TO START WITH HAM RADIO

    Starting with ham radio can be an exciting journey into the world of amateur radio communication. Here are the steps you can follow to get started:

    1. Learn About Ham Radio: Familiarize yourself with what ham radio is all about. It’s a hobby that allows licensed operators to communicate with each other using various frequencies and modes. Youtube has great channels that you can watch, check it out!

    2. Study for the License Exam: In most countries, you need to pass a license exam to operate a ham radio legally. Study materials are often available online or through local amateur radio clubs. Topics usually include regulations, operating procedures, and basic electronics.

    3. Find a Local Club or Elmer: Joining a local amateur radio club can be immensely helpful. These clubs often offer classes, exams, and mentoring (sometimes referred to as an “Elmer”) for newcomers. They also provide opportunities to meet experienced operators and learn from their knowledge.

    4. Take the License Exam: Once you feel prepared, take the license exam. The exam typically covers multiple-choice questions on regulations, technical knowledge, and operating practices. Passing the exam grants you a call sign and a license level (which varies by country).

    5. Get Your Equipment: Start with basic equipment appropriate for beginners. A popular choice is a handheld transceiver (HT) that operates on VHF/UHF bands. As you gain experience, you can expand your equipment to include HF bands and more sophisticated setups.

    6. Practice Operating: Start making contacts with other ham radio operators. Join nets (scheduled on-air meetings), participate in contests, or simply chat with other hams. Each contact helps you improve your skills and learn more about the hobby.

    7. Continue Learning: Ham radio offers a wide range of activities beyond basic voice communication, including digital modes, satellite communication, and even amateur television. Explore these options based on your interests and technical skills.

    8. Contribute to the Community: Many hams enjoy contributing to emergency communications, public service events, or education. Volunteering for these activities not only helps others but also enhances your own skills and network within the ham community.

    9. Upgrade Your License: As you gain experience, consider upgrading your license to gain access to more frequencies and operating privileges. This often involves passing additional exams that cover more advanced topics.

    10. Have Fun and Enjoy the Hobby: Ham radio is a diverse hobby with opportunities for learning, experimentation, and making friends around the world. Enjoy the journey and don’t hesitate to ask for advice or help from fellow hams along the way.

    WEARC is a great group of people that can help you with each step. Subscribe to our blog and reach out in the comments, via Skype, WhatsApp or show up at our meetings. We will always do our best to help you!

    73,

    KD2WWU

  • Meshtastic Waterproof Device – BEST DESIGN

    Meshtastic Waterproof Device – BEST DESIGN

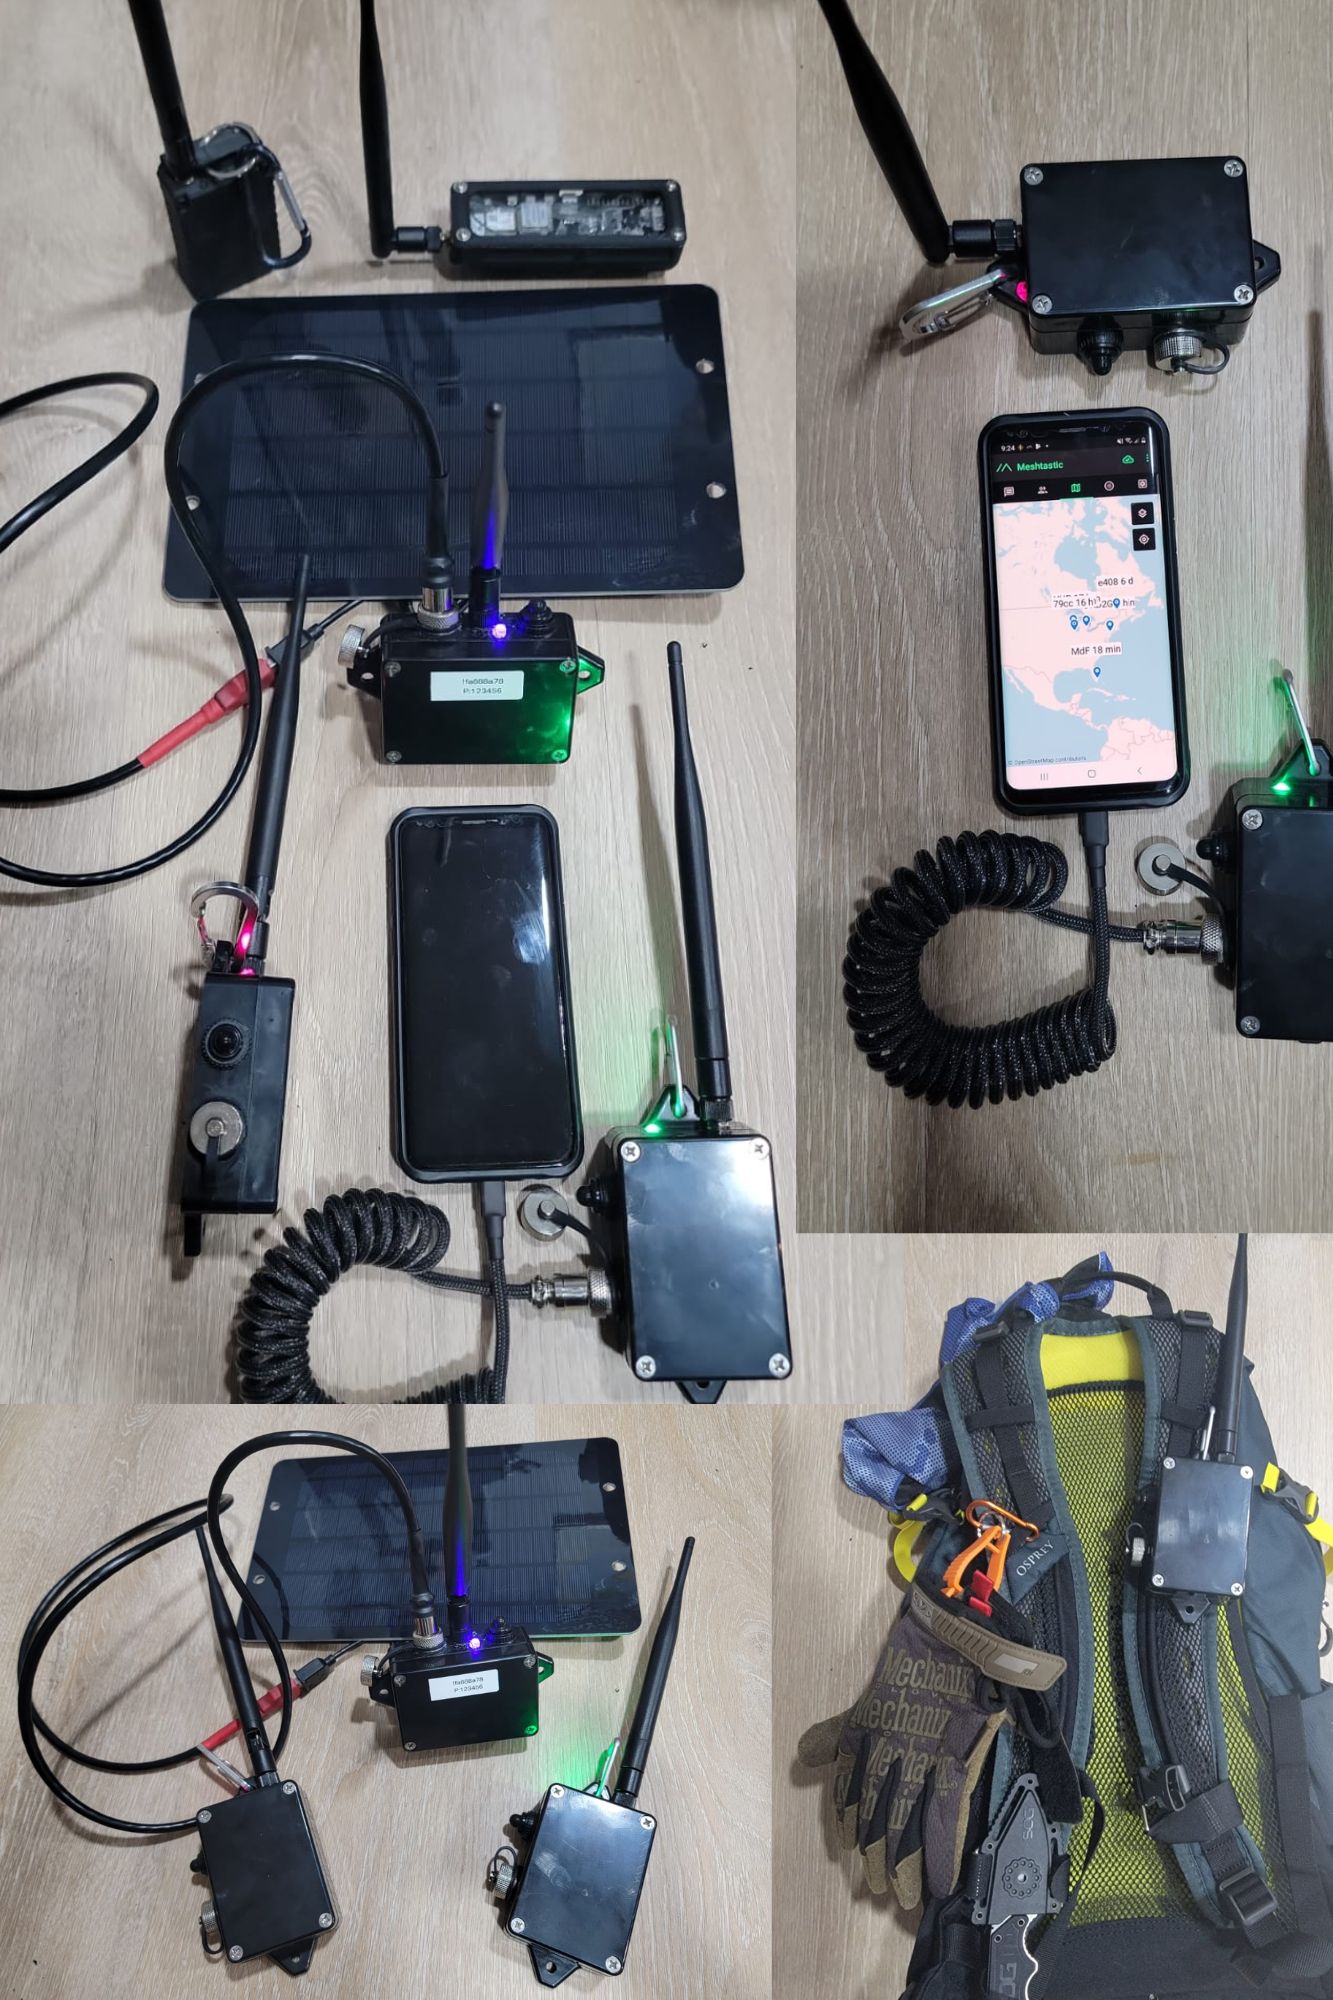
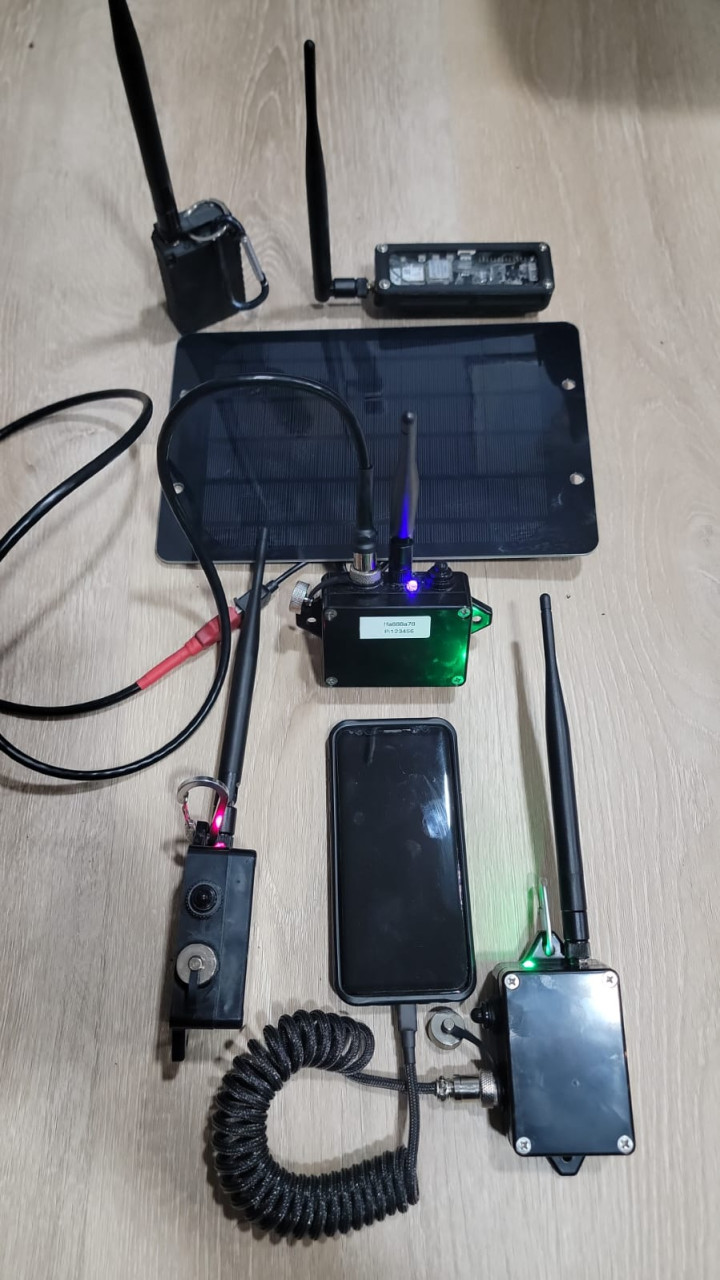
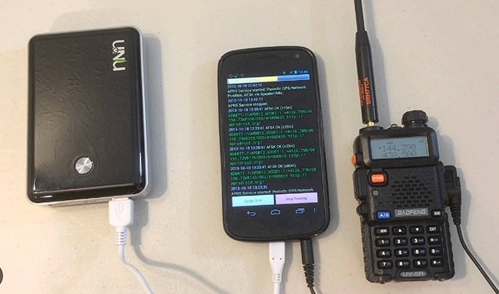
    Let’s build my version of the LoRa Meshtastic ESP32 device. What do we want to achieve: 

    1. As waterproof as it can be.

    2. No 3D Printed needed.

    3. Battery that can run for a couple days.

    4. Easy USB waterproof connector that can be used for charging.  

    5. ON/OFF switch WITH LED ON/OFF indicator 

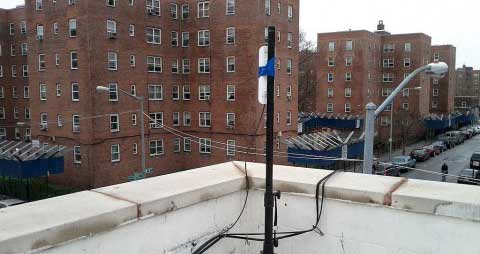
    6. High gain antenna.

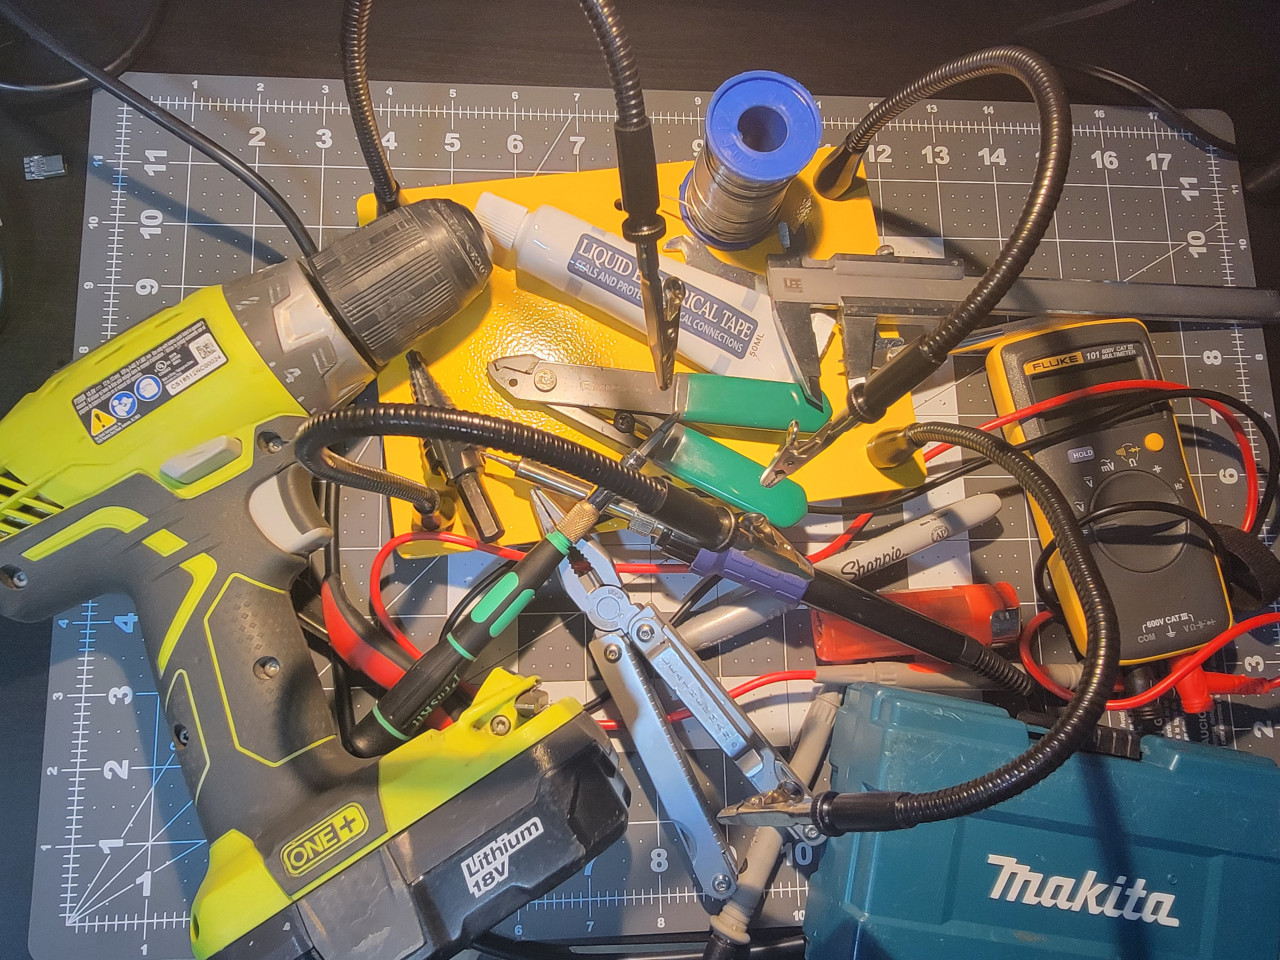
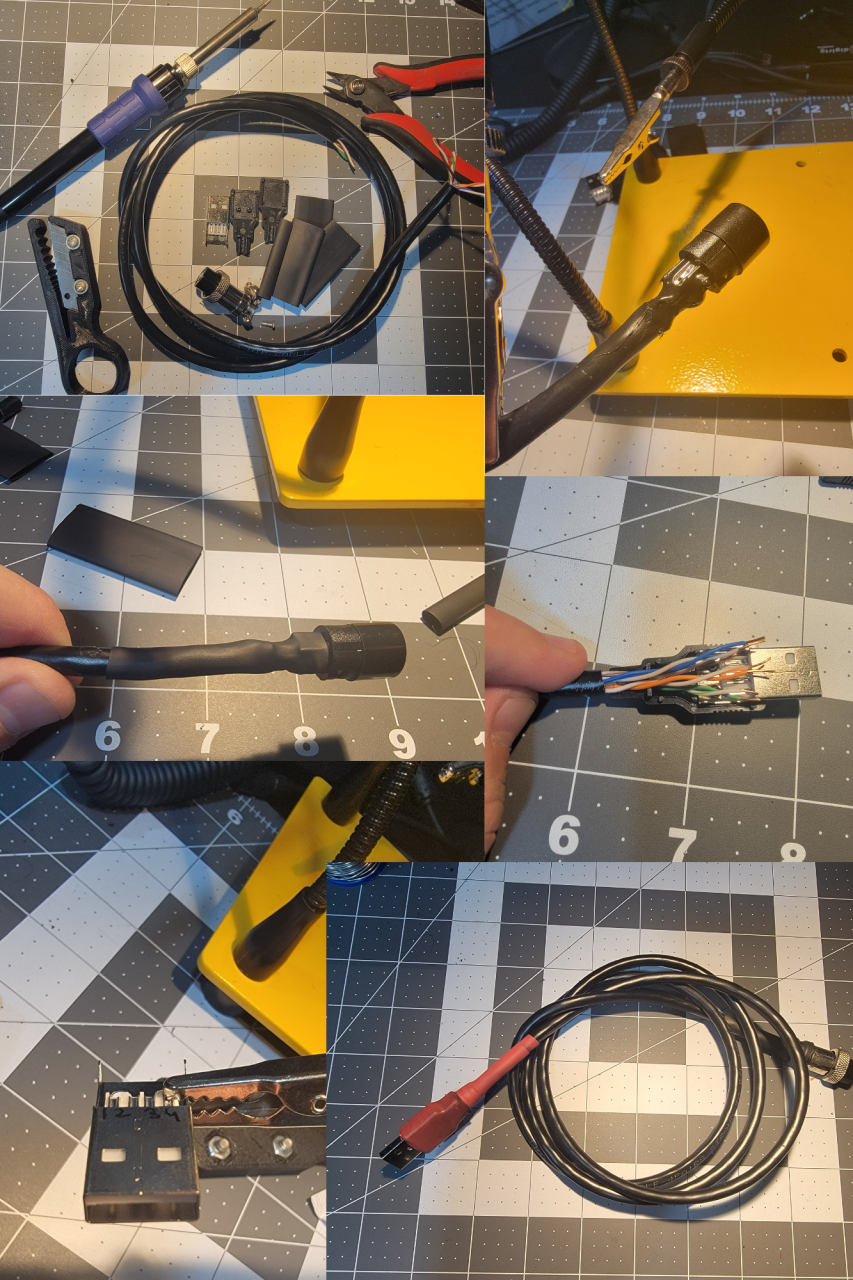
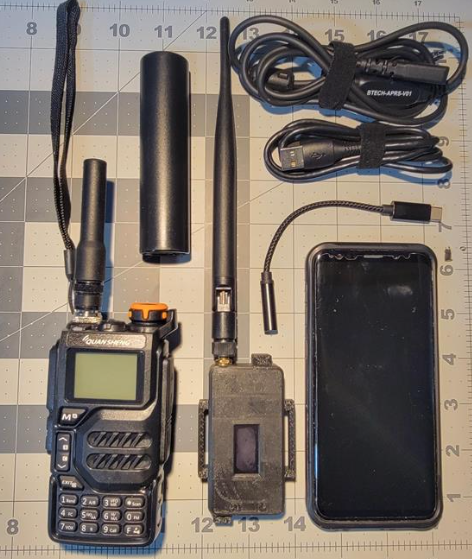
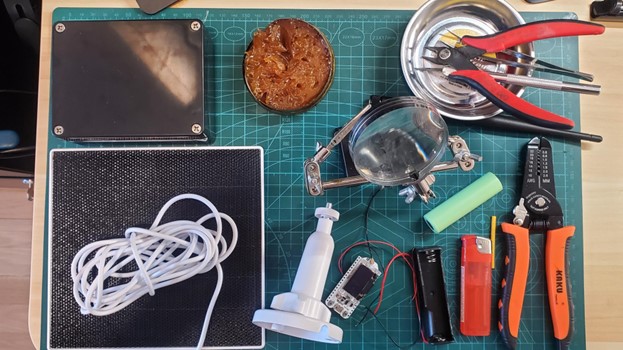
    Tools needed below (just look at the picture below):

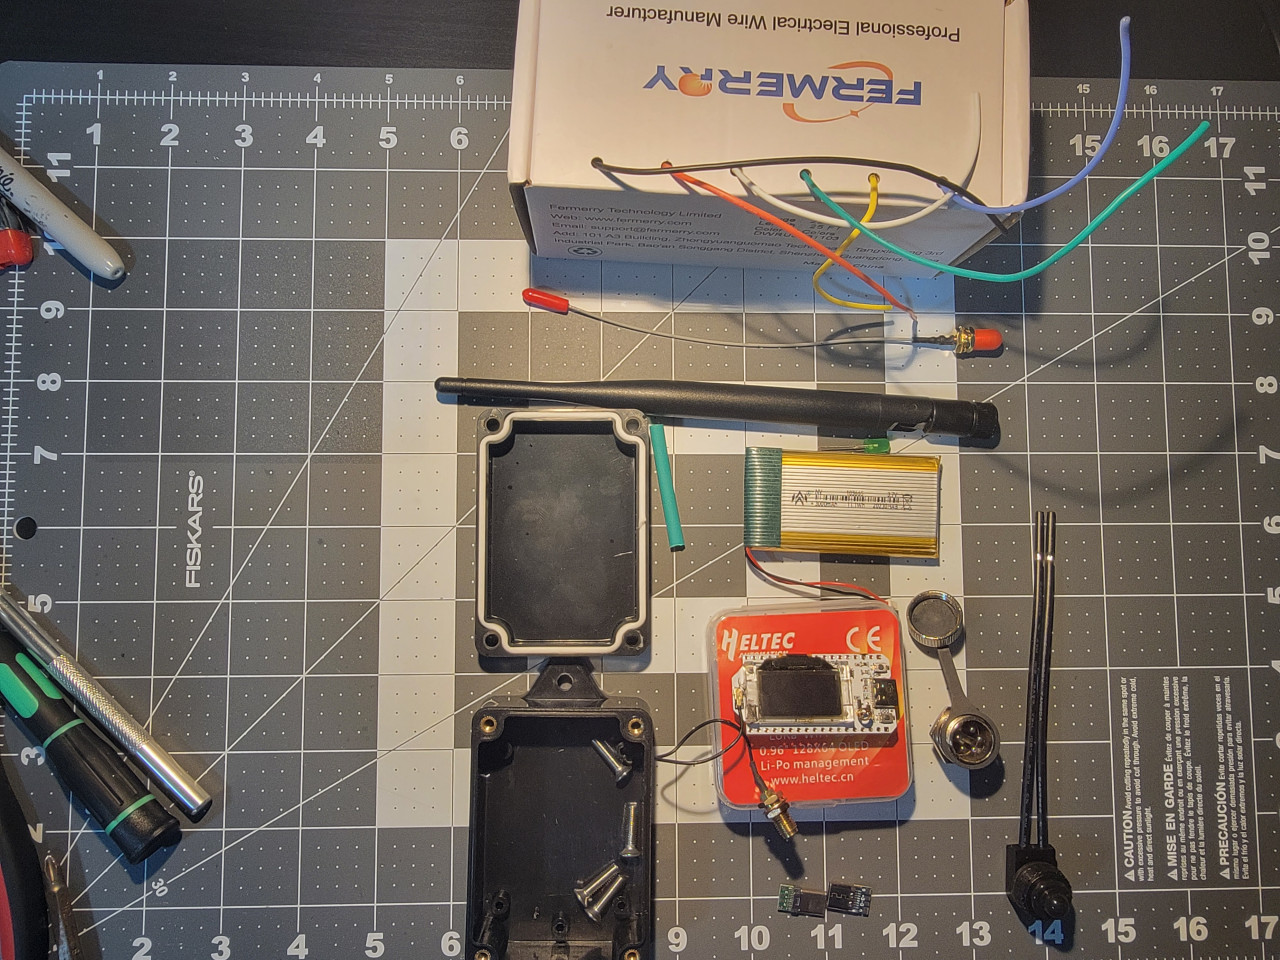
    Parts that you will need: 

    ALL AVAILABLE ON AMAZON! 

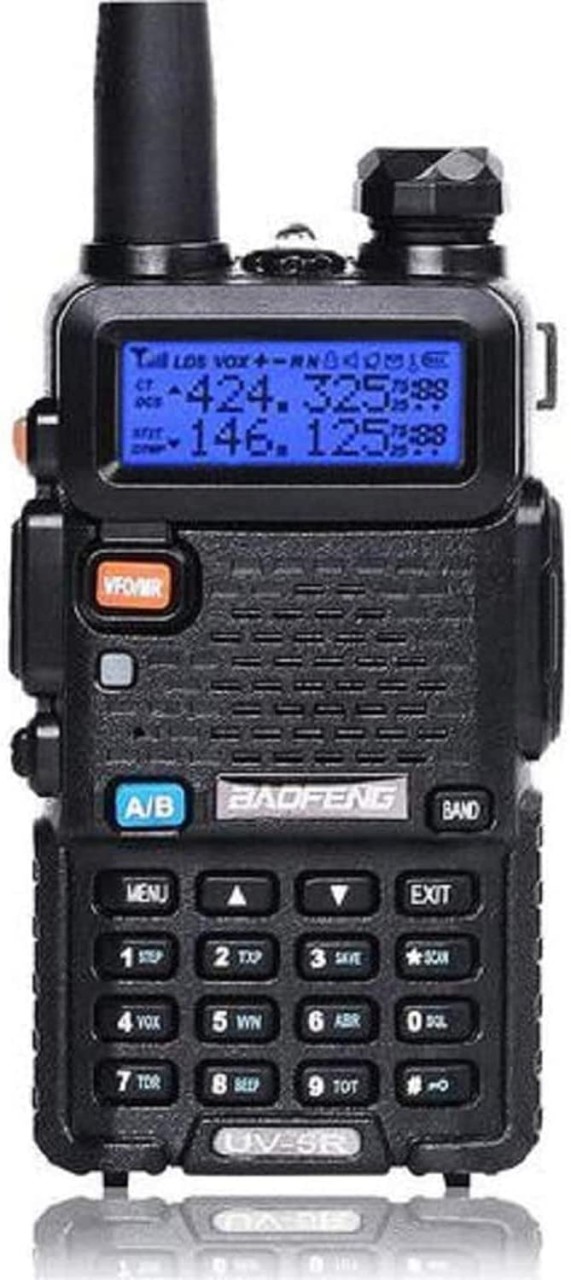
    915MHz ESP32 LoRa 0.96 OLED Development Board V3 SX1262 Type-C

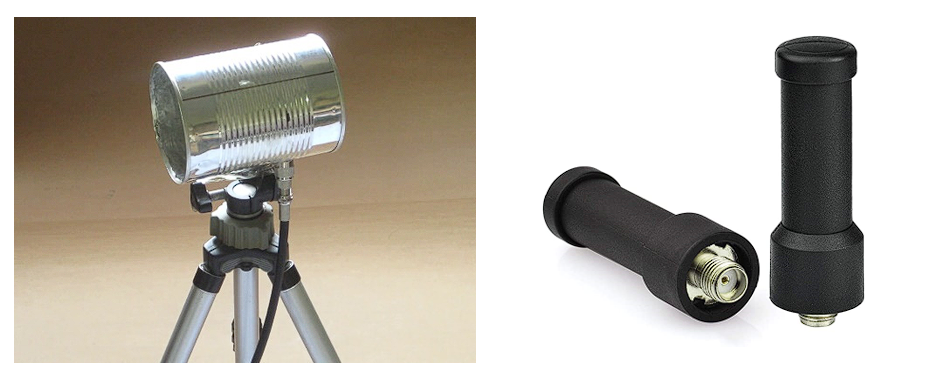
    915MHz LoRa Antenna Omni 5dbi Gain SMA Male for ESP32 LoRa OLED Board

    MakerFocus 4pcs 3.7V 3000mAh Lithium Rechargeable Battery 1S 1C Lipo Battery with Protection Board

    mxuteuk 5pcs 12V RV Waterproof Push Button Switch Black ON/Off SPST Switch with 4.52inch Lines for RV/Motorcycle/Car MXU-KP-107

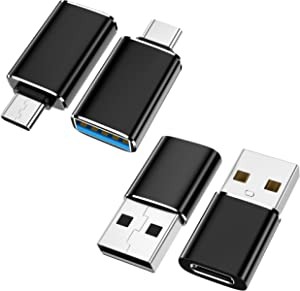
    10PCS USB 3.1 Type C Connector 24 Pins Male Female Plug Socket Receptacle Adapter to Solder Wire & Cable 24P PCB Board Support Module

    VizGiz 10 Pack USB Plug Replacement 4 PIN Type A Female Male Socket Connector Solder Terminal Repair

    DKARDU 6PCS GX16 5 Pins Aviation Connector Male/Female Panel Aviation Wire Connector Plug Socket for Power Connection with 6PCS Waterproof Cover

    Zulkit Junction Box ABS Plastic Dustproof Waterproof IP65 Universal Electrical Boxes Project Enclosure with Fixed Ear Black 3.27 x 2.28 x 1.30 Inch

    DiCUNO 450pcs (5 Colors x 90pcs) 5mm LED Light Emitting Diode Round Assorted Color 

    22 AWG Stranded Wire Silicone Tinned Copper Wire Spool 25ft Each 6 Colors Flexible 22 Gauge Hook up Electrical Wire Kit from Fermerry
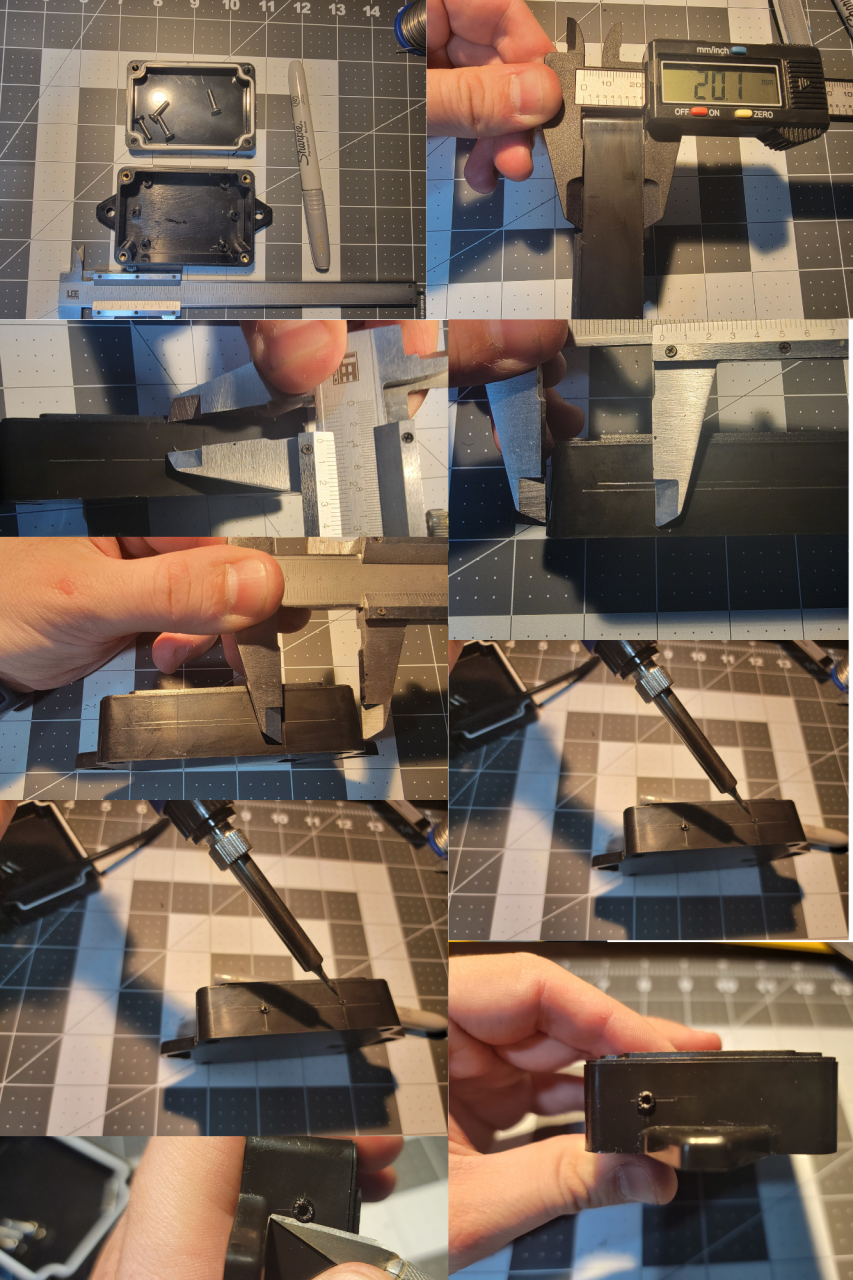
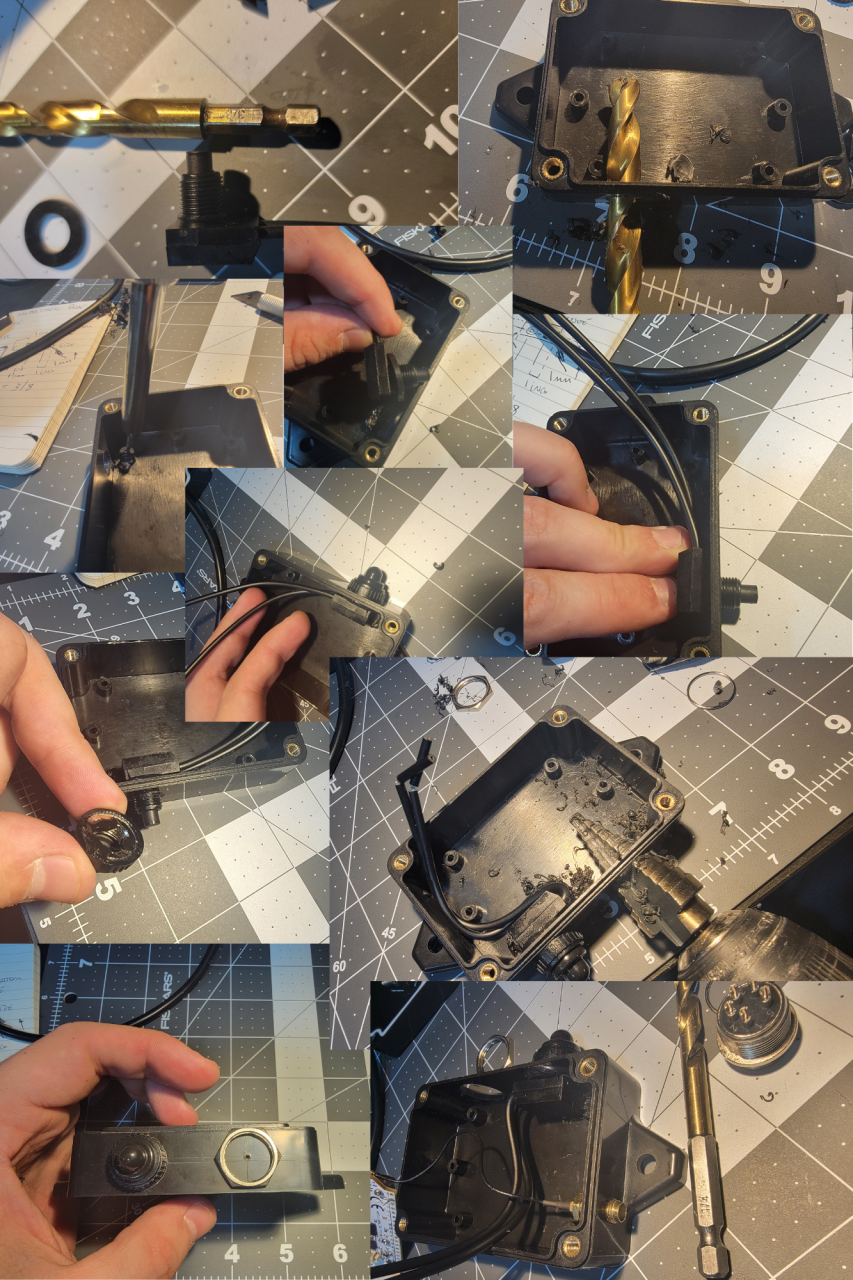
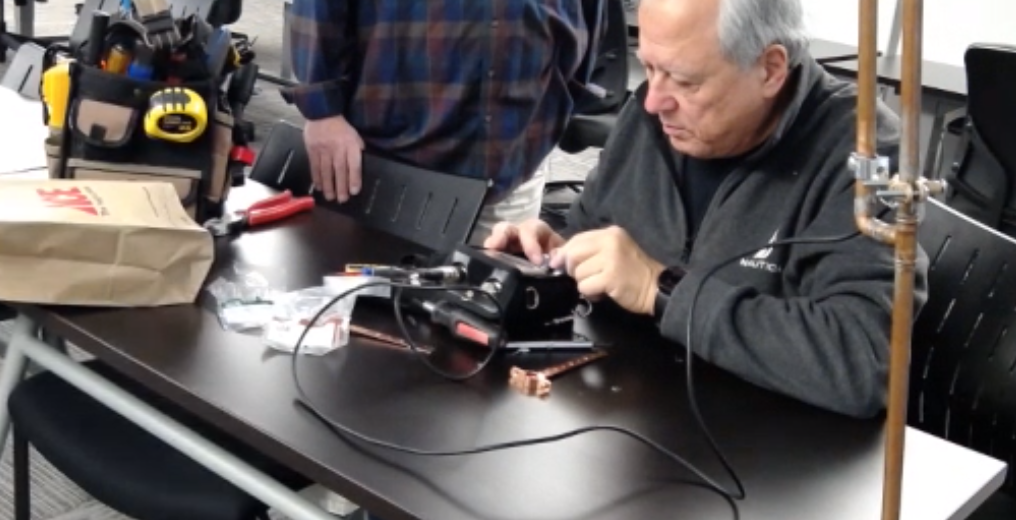
    STEP 1 – Case

    Let’s drill the box:

    Mark one of the sides, from lower chanel of the top down, it’s 20mm tall. Do 2 lines, one at 10mm another 7.5mm from the top. The 10mm line is the guide for the switch, the 7.5mm from the top one is for the GX16 5 pin connector. Mark 1 inch from each side crossing the 2 previous lines. 

    With a soldering iron, do some guiding holes. The one on the bottom line 10mm is for the switch, the other one is for the GX16 connector. At the top, mark a place for the antenna SMA connector. We can drill the LED hole in a few.

    Switch is 3/8”, use a step drill for the GX16, 5/8” is the hole size. I used some liquid electrical tape to help with the water proofing. Don’t forget the rubber washer inside of the switch. The SMA connector is a 1/4” and the LED is 3/16”, it’s one of the final holes, in the next section, add where you want. 

    I had to use the soldering iron to remove a post that was in the way of the On/OFF switch. 

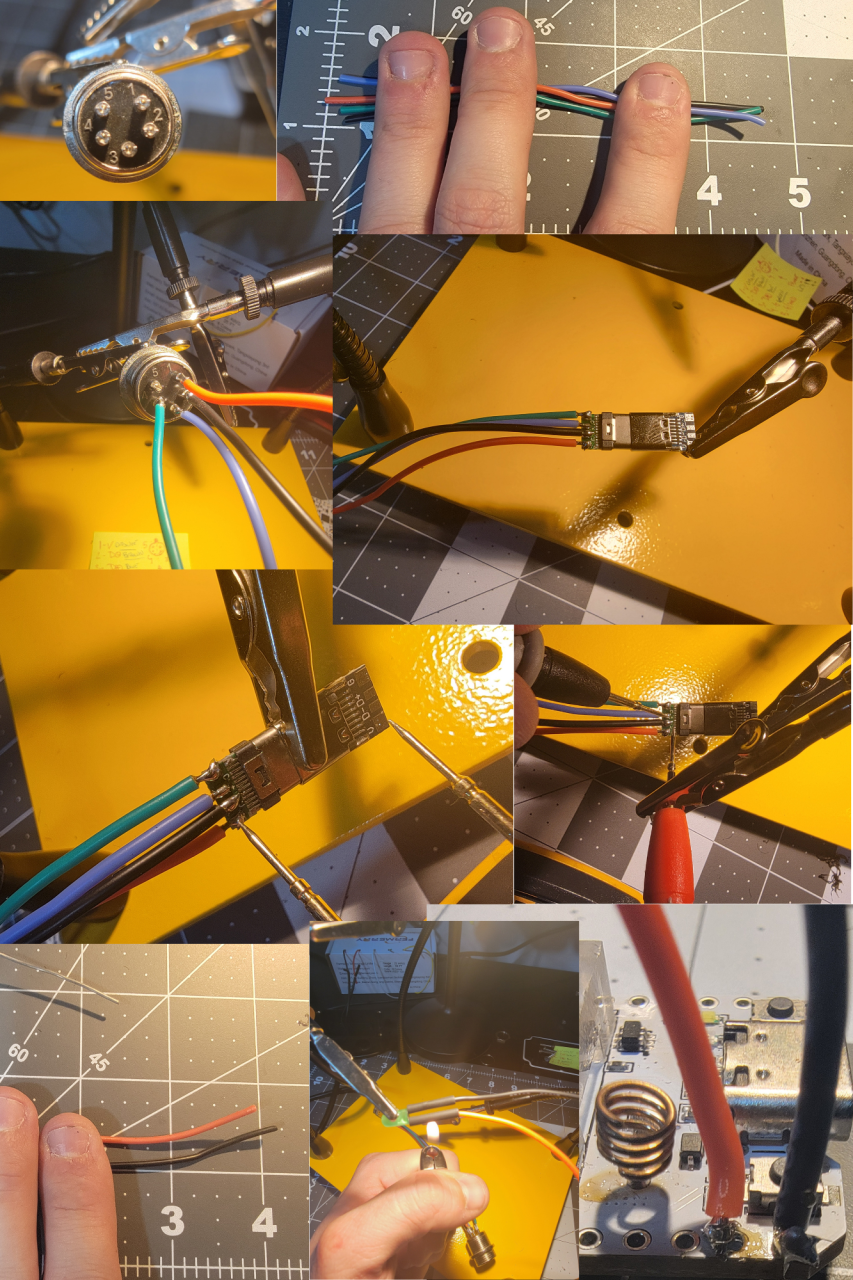
    STEP 2 – Soldering connectors

    The GX16 has some numbers. You can do whatever combination of color you want. 

    My setup is: 

    1 – RED (+V) 

    2 – B BRROW/BLACK (Data – )

    3 – Blue (Data +)

    4 – Green (Ground or V-)  

    5 – Nothing, no connection

    4 1/2” should be enough for the the connection between the USBC and the GX16, same for the LED. LED is connected to the 3V and ground pins of the ESP36. 

    For USB-C side I kept the male and female connected just to see better and also to test for wrong connections / soldering bridges between the 4 connectors. ALWAYS check. There should be NO continuity between the 4. 

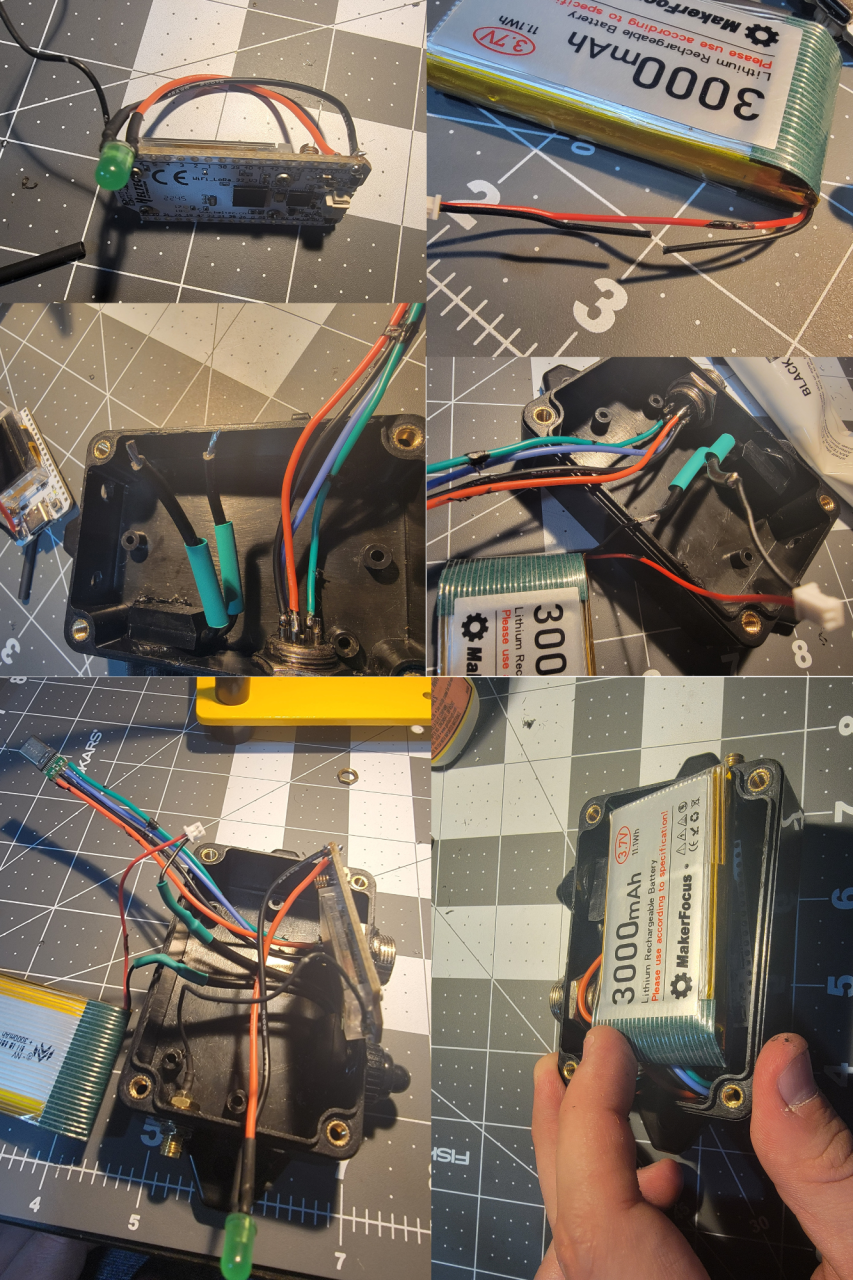
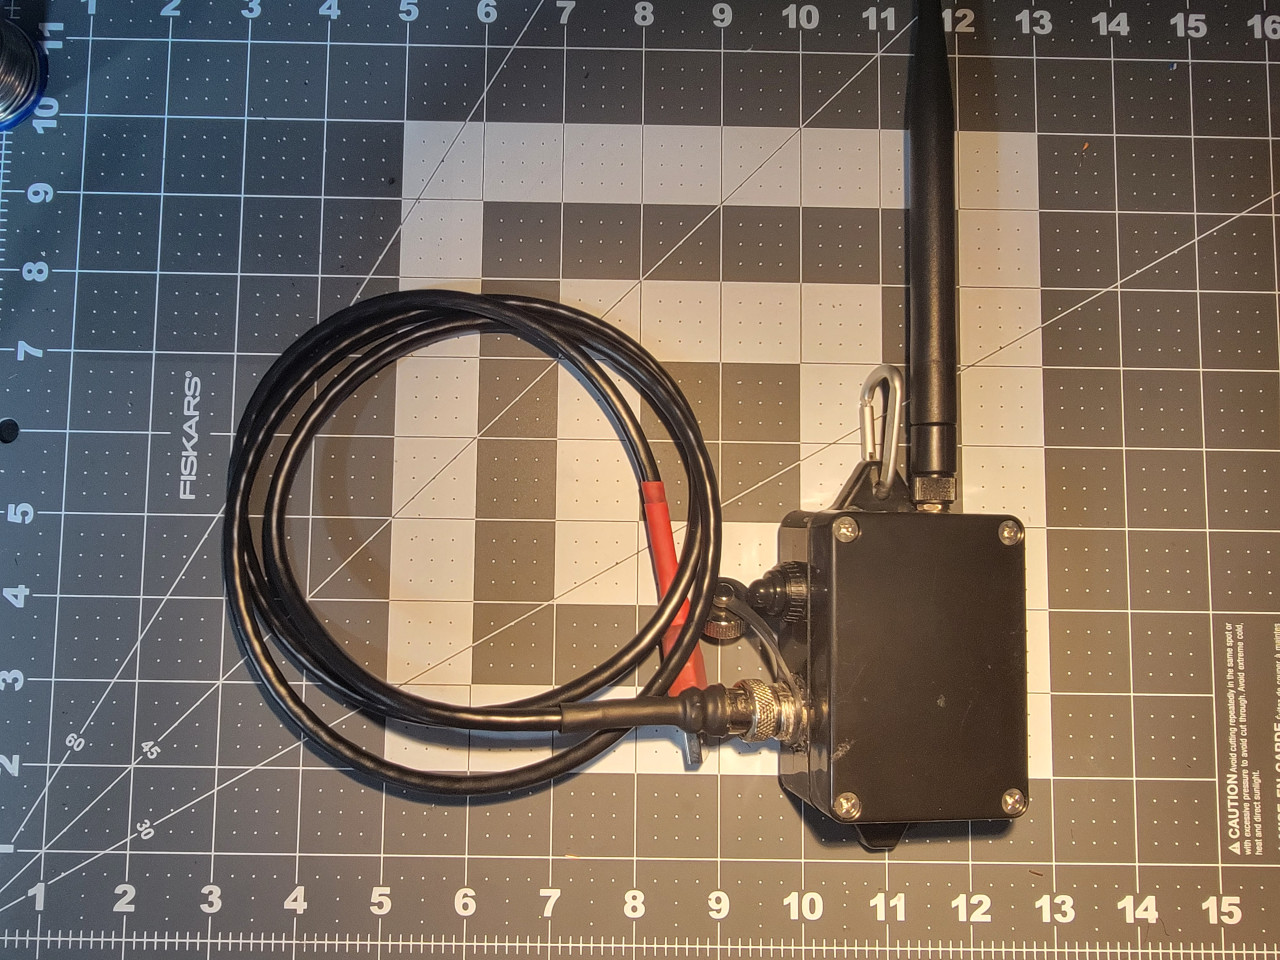
    STEP 3 –  Final Device assembly 

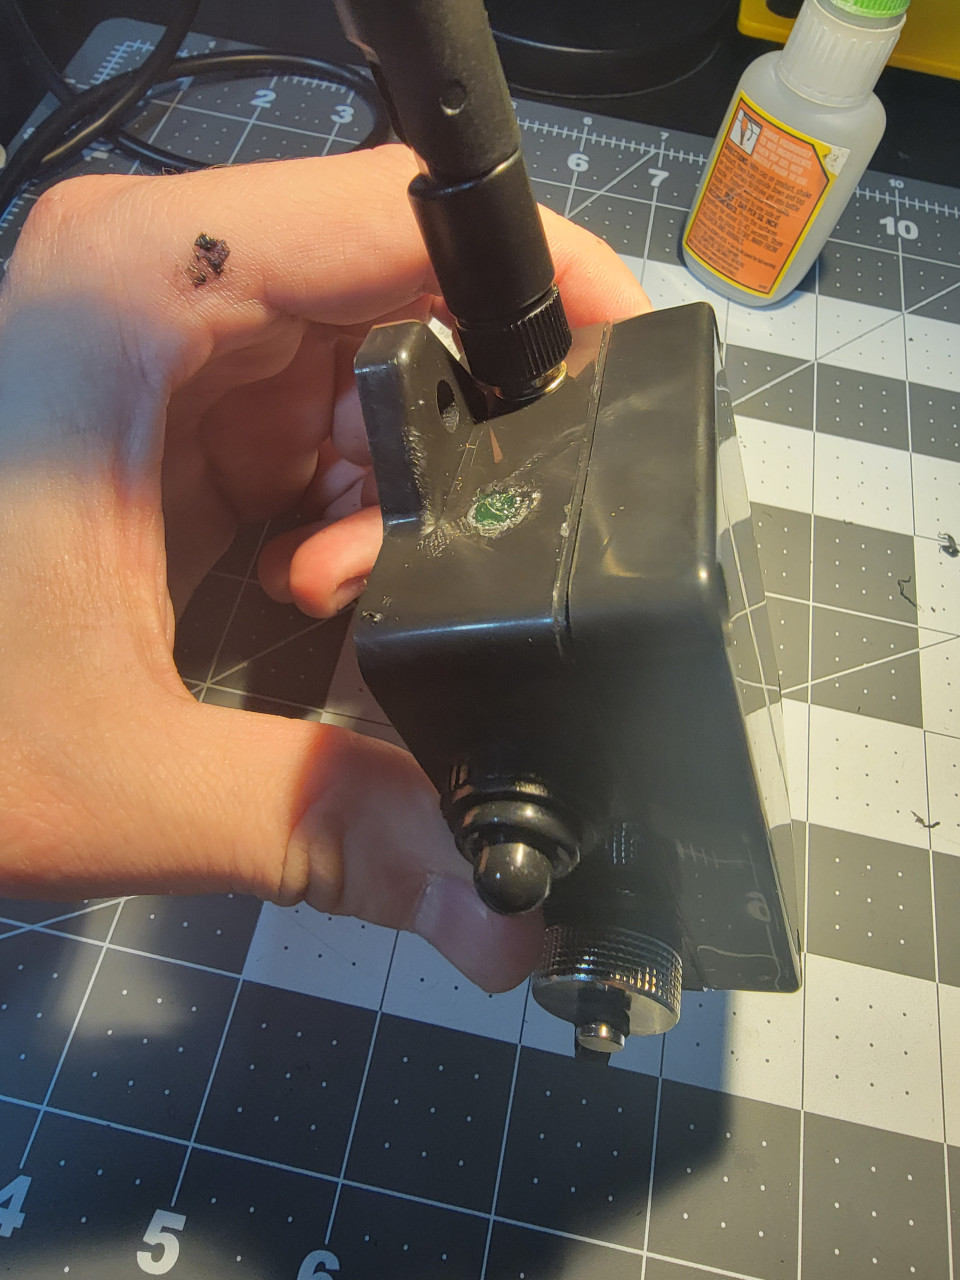
    Cut one of the battery cables and connect to the switch. Drill the final LED hole 3/16” and use super glue to keep the LED in place. It’s a snug fit and the super glue also helps with the waterproofing.  The way it fits the best is with the ESP32 board below the battery. 

    IMPORTANT: Before connecting the battery, connect the antenna. NEVER turn on the device with the antenna disconnected. Make sure you use the switch off after testing and close everything. Device is done. 

    Almost done… The GX16 cap has a rubber, I added some super glue between the base of the connector and the rubber seal to keep the cap from falling when cap is open.  Screw the lid of the case and it’s done. 

    STEP 4 – USB Cable for Data and Charging

    Use whatever cable with 4 or more wires/conductors. I’m using a Cat 6 POE Ethernet Cable Waterproof Heavy high Speed LAN Network. It’s 4 pairs so I twisted the ends together of each pair. Numbers are in the male connector of the GX16 connector.

    Use plenty shrinking of tube. I used 2 layers begore closing the GC16 connector so the metal part grips the cable well. Also used liquid electrical tape to make sure things stay in place and don’t short in case cable is pulled.   

    1. 5V + (Orange + White with orange Stripe)

    2. Data – (Brown + White with brown stripe)

    3. Data + (Blue + Blue with white stripe)

    4. Ground AKA 5V- (Green + Green with white stripe)  

    TIP: Number the USB male connector: White plastic on top, left to right (1,2,3,4) 

    IMPORTANT:

    DEVICE WILL ONLY CHARGE WHEN ON/OFF SWITCH IS ON so you can connect via USB to charge in a solar panel, power bank or anything else you want. Add a carabiner to hand in your backpack, tree etc. 

    DONE!!!! Congratulations!!! 

    Connect to your computer, go to https://flasher.meshtastic.org/ and flash the most recent stable version of Meshtastic online. 

    IMPORTANT: 

    DEVICE WILL ONLY CHARGE WHEN ON/OFF SWITCH IS ON so you can connect via USB to charge in a solar panel, power bank or anything else you want. Add a carabiner to hand in your backpack, tree etc. 

    You are responsible for things you do. Any error, please leave a comment and this remember this is an AMATEUR GUIDE so it’s your responsibility to make sure you don’t do anything stupid. This contains a LITHIUM BATTERY and will be connected to a COMPUTER so there are risks. I’m showing how I did and worked for me, result may be different for you. Don’t cut, drill or burn your fingers, house etc. BE CAREFUL! 

    73

    KD2WWU

  • The best commuter backup communications plan (Part 1 – The problem,  the bad solution and a possible solution)

    The best commuter backup communications plan (Part 1 – The problem, the bad solution and a possible solution)

    As many people that commute daily to work, I take all the complex systems that support me for granted. I start my day in the suburbs of New Jersey driving my car to the train station, get there 5 mins earlier and check my phone to see how the line is operating. The train is almost always on time, I get a seat and enjoy my 5G connection to read the news to know what is going on, I check my emails, I interact with people on social media and when the train slows down, I use my GPS to check how far I’m from the office in NYC. 40 mins later I’m at Penn Station.

    In 1h I exchange a lot of information and a question comes to my mind. What happens IF all these complex and inter connected infrastructure fails? How do I check what is going on, how do I check what route I should take to get back home? And most importantly, how do I keep in touch with my friends and family to check if they are ok?

    As an amateur radio operator for a few years, the answer seems easy. I just use a radio. The tool to solve most of the communication challenges is easy to define but the know-how is the most critical aspect. Just because you own a hammer, it doesn’t mean you know how to build a house. The monumental communication tasks that we perform from the toilet look like magic due to the heavy layers of technologies operating in perfect synchrony popping all you need in the palm of your hands. This magic also distract us from remembering phone numbers, knowing where we are and sometimes even how to effectively communicate with another human being right in front of us.

    Since my commute takes one hour and I usually solve my Wordo, check all my social media, weather etc in 10 mins, I dedicate the remaining of the time to develop a framework to effectively locate MYSELF, inform MYSELF and communicate with others with MY OWN means.

    I want to share with you the tools and most importantly the know-how to at the same time to structure my thinking and to learn from NEGATIVE feedback because I was born in the 80’s and this is how I learn faster and more effectively.

    First let me eliminate the stupid ideas. HF is not the solution for sure. HF needs too much equipment and too much knowledge to make it work and we will not accomplish anything carrying a 100 pounds of equipment or finding a place to hang an end fed antenna in an emergency. Most of us can’t do it properly not even when we have all time and tools available.

    Next obvious answer is to carry a “high quality” HT with the local repeaters preprogrammed and try to reach one. Problem is… how do you align with whoever is trying to talk to you the frequency, time etc… Other thing is, there is no “voice mail” so even if your equipment works and does everything right, these 2 things need to be happening at the RIGHT TIME and in the RIGHT PLACE. Too many factors so this would be a possible BUT “unlikely to work” solution.

    We are trying to mitigate the RISK of something else to fail and just as a reminder: “Risk is the combination of likelihood and severity.” per Dr. Google. Adapting this to our scenario, likelihood would be related to the amount of times you would need to perform a task correctly and the severity would be the damage to the final goal if something doesn’t work properly.

    With this principle in mind, we narrow down to a communication system that allows you to acquire information as fast as possible verbally (via FM radio, people talking in local repeaters, emergency agencies etc) and at the same time to send messages that are “stored” in text so there is a logging system with the message itself, the time and the location. The system needs to be compact, operate with low power consumption (QRP) and relatively easy to operate, even better if it can have redundancy to make sure we connect 2 points via multiple routes and alternative ways.

    Now let’s get closer to a possible solution: APRS using a USBC chargeable HT + a simple cable. This is one of the best solutions that could work in easily and effectively. 5W can reach 100 miles easily with no barrier and in 2m frequencies (144 MHz) it can get far even in the middle of buildings.

    If you keep an old smartphone in your house connected to a radio and a battery eliminator, you can even have an iGate, Digipeter with the IGATE2 PRO APP. No power, no problem… with simple battery banks AND/OR small solar panels, you can get days of reliable communication that is logging all communication traffic that it can receive. 

    https://play.google.com/store/apps/details?id=adn.IGate2.Pro&hl=en_US&gl=US

    Each APRS message sent via APRS Droid uses your phone GPS to send the messages with the coordinates, time and even some basic telemetry. Good thing is that besides the KISS connection, you can also use TCIP (internet) in “normal conditions” to practice. Some nodes of this infrastructure are connected to the internet and once you reach one VIA RADIO or VIA INTERNET, by using the right commands, you can send emails, WhatsApp messages. Another useful function is to request the weather reading from the closest weather stations around you 100% via radio.

    From the “commuter” perspective, by carrying a small HT (preferably USB-C chargeable) , a small cable, you have the ability to use your own phone and by saving offline maps, to have a powerful communication tool.

    The other positive aspect is the redundancy. A lot of the operators are repeaters so this is a MESH style solution. Mesh means that the message is repeated multiple times and even if one node fails, another will e able to relay the message (that by the way takes a sec or 2 to be transmitted).Having a quick burst of information via text makes the system very power efficient. The phone battery will be the limitation but with a battery bank, this can be solved. Messages are also only transcribed by people using the same technology. APRS.FI website: https://aprs.fi

    APRS works in only 1 frequency 144.390. IF you have a new phone W/O a 3.5mm audio jack, you can use a simple adaptor.

    That’s all for an initial introduction and an overview of one possible solution. In the next articles of these series we will keep exploring other solutions and later on we will have some deep dives into how to make something that works instead of just talking about possibilities.

    Need to go, my train is arriving. Penn Station is at smelling distance.

    73

    KD2WWU

  • J-Pole Antenna Tuning

    J-Pole Antenna Tuning

    We have a new project!!!!

    Tuning a J-pole antenna is a crucial step in optimizing its performance for a specific frequency or frequency range. The tuning process involves adjusting the lengths of the antenna elements to resonate at the desired frequency, which ensures maximum efficiency and a low standing wave ratio (SWR). Here’s a guide on how to tune a J-pole antenna:

    1. Prepare Necessary Tools:

    • SWR Meter or Antenna Analyzer: This tool is essential for measuring the standing wave ratio and ensuring that the antenna is properly tuned.
    • Coaxial Cable: Use a length of coaxial cable to connect your J-pole antenna to the SWR meter or antenna analyzer.
    • Adjustment Tools: Depending on your J-pole design, you might need tools to adjust the length of the elements. This could include a hacksaw for cutting tubing or wire, as well as a soldering iron if adjustments involve soldered connections.

    2. Initial Assembly:

    • Construct the J-pole: Build the J-pole antenna according to the design specifications. Follow the calculations for element lengths based on the target frequency.

    3. Install the J-pole:

    • Mount the Antenna: Install the J-pole in its intended location. Ensure that it is clear of obstructions and properly grounded if required.

    4. Connect SWR Meter:

    • Connect Coaxial Cable: Use a length of coaxial cable to connect the J-pole antenna to the SWR meter or antenna analyzer. Connect one end to the antenna feed point and the other to the SWR meter.

    5. Measure SWR:

    • Check Initial SWR: Transmit a test signal and observe the SWR readings on the meter. A high SWR indicates that the antenna needs tuning.

    6. Adjust Element Lengths:

    • Fine-tune the Lengths: If the SWR is too high, adjustments to the element lengths are needed. Make small adjustments, either by trimming or extending the lengths, and recheck the SWR after each modification.
    • Repeat the Process: Iterate this process until the SWR readings are within an acceptable range. Aim for an SWR close to 1:1 for optimal performance.

    7. Test Across Frequencies:

    • Check Bandwidth: Verify that the antenna performs well across the entire frequency band of interest. Make additional adjustments if necessary.

    8. Secure Connections:

    • Once Optimized: Once the SWR is within an acceptable range and the antenna is performing well, secure all connections to prevent unintentional changes.

    9. Final Installation:

    • Securely Mount the Antenna: If adjustments have been made, ensure the antenna is securely mounted in its final position.

    By carefully following these steps and making gradual adjustments, you can effectively tune a J-pole antenna for optimal performance on your desired frequency or frequency range. 

    Photo Credit: Mike Abbey

  • Simple Guide for a POTA activation

    Simple Guide for a POTA activation

    To conduct a POTA (Parks on the Air) activation, which involves operating amateur radio equipment from a designated park or natural area, follow these general steps:

    1. Research Parks: Identify parks or natural areas that are eligible for POTA activations. You can visit the POTA website (https://parksontheair.com/) or use the POTA mobile app to find eligible parks near your location. Make sure to check the rules and regulations specific to the park you plan to activate.
    2. Obtain Permits (if necessary): Some parks may require permits or permissions for radio operations. Contact the park authorities to inquire about any specific requirements and obtain the necessary permits or permissions well in advance of your planned activation date.
    3. Plan Your Activation: Determine the date, time, and duration of your activation. Consider factors such as weather conditions, park accessibility, and potential interference from other activities in the park. Prepare a detailed plan including the equipment you will use, the bands and frequencies you intend to operate on, and any special considerations for antenna setup.
    4. Set up Your Equipment: Gather all the required amateur radio equipment, including your transceiver, power source, antennas, cables, and any accessories. Set up your equipment according to your plan, ensuring proper grounding and compliance with safety regulations.
    5. Antenna Deployment: Install and configure your antenna system based on the available space and park regulations. Consider using portable or temporary antenna solutions such as wire antennas, vertical antennas, or magnetic loop antennas. Ensure that your antenna installation is safe and does not cause any harm to the environment or park structures.
    6. Make Contacts: Begin operating your amateur radio equipment and start making contacts with other amateur radio operators. Use the designated POTA frequencies or work the bands that provide the best propagation conditions at that time. Be courteous and follow good operating practices, adhering to the regulations and guidelines set by your licensing authority.
    7. Log Your Contacts: Maintain an accurate log of all your contacts during the activation. Include relevant information such as the call signs of the stations worked, the time of contact, the band and frequency used, and any additional details required for POTA credit. Ensure that your log is complete and legible.
    8. Share Your Activation: After completing your activation, consider sharing your experience with the amateur radio community. Upload your log to the POTA website or app to receive credit for your activation and contribute to the POTA program. Share photos, videos, or blog posts on social media or amateur radio forums to engage with fellow operators and promote the POTA program.

    Remember to always respect park rules and regulations, practice good environmental stewardship, and represent the amateur radio community positively during your POTA activation. Enjoy the opportunity to operate outdoors and explore the beauty of nature while pursuing your amateur radio hobby. 

  • WEARC Fox Hunt April 2023

    WEARC Fox Hunt April 2023

    The fox:

    Bionics MicroFox 15 (@146.565 MHz)

    https://www.byonics.com/mf


    The “hunting weapons”:


    MWRF Source SMA Male to SMA Female 6GHz Attenuator 2W (30 dB)

    The greatest transceiver of all times: Baofeng UV5R  

    SDR: Nooelec RTL-SDR v5 SDR – NESDR Smart HF/VHF/UHF (100kHz-1.75GHz)

    USB C Male to USB female adaptor

    Compass: BIJIA Orienteering Map Compass


    Yagi:

    Metal broom handle from the Dollar Tree

    Measure tape from the Dollar Tree

    RG8X Coax + BNC connector

    3D printed support for the measuring tape 

    Loop Antenna:

    Just a piece of coax and a BNC connector. At the top there is only a coax’s shield gap of 1 inch. Pencil is just giving support to the cable. 

    https://www.youtube.com/watch?v=zJbBWm6KyOM

    Software:

    App to calculate antenna dimensions:

    https://play.google.com/store/apps/details?id=com.daveyhollenberg.amateurradiotoolkit

    SDR for the Android (also available for iPhone):

    https://play.google.com/store/apps/details?id=marto.androsdr2

    Premium key ($10,99):

    https://play.google.com/store/apps/details?id=marto.androsdr.key

    Driver (to connect to any SRD USB rig):

    https://play.google.com/store/apps/details?id=marto.rtl_tcp_andro

    App to mark the bearings:

    SigTrax ($3.99)

    https://play.google.com/store/apps/details?id=com.amcept.sigtrax


    We started at 10AM at the Red Cross parking lot (Point 1 on the map below). Jerry initiated transmission from his HT with 5W in 10-minute intervals, we got 2 bearings (both off) and Yagi was pointing Northwest, Loop was pointing West but also reading Northwest when elevated a couple feet. We decided to go Northeast to a park at Point 2 on the map, at which point we both got a good reading. We were agreeing 100%, and the bearing was PRECISILY pointing to the fox. This was impressive.

    However, we were not very confident at that point because it was a parallel line to the fist bearing, but both were pointing West, so we decided to go all the way North to Point 3 where we got the first intersection with bearing from Point 2.

    Driving to Point 4 was our best option because we were almost getting out of the 5 mile range, and the signal was strong. We used the attenuator and Jerry called to say that he was going to use just the low power (15mW). Pressure was on. Interesting enough, driving around the car’s mobile radio started to receive even in low power. We knew we were close. At Point 4 the Yagi was not very precise, but the loop antenna got a PERFECT bearing Southwest so we narrowed down to the nearest park/public area.

    We were close but we got a lot of signals bouncing around in multiple directions. We used the HTs with the rubber ducky antennas. Key factor here was to use our bodies as a barrier to confirm the direction that was not receiving. Holding the HT close we were able to determinate the rough direction and walked 1 block to Point 5 where we saw Jerry! 

    From that point we just removed the antenna completely, walked around using the “body shield technique”, and voila! Fox was found. 

    1:43hs in total (coming back to Red Cross only took 12 minutes). Total distance traveled was 7.99 miles. We used Komoot app to track and made a nice video using the Relive app:

    https://www.relive.cc/view/vWqB3jLMmQv


    Tips and improvement opportunities: 

    1. Clearly it’s is a team effort, one driver and one navigator with an Yagi would speed up the process a lot. It might be better to use aluminum wire and a PVC pipe to get a more stable structure and put the antenna outside of the car while driving. A good bearing could be taken in open areas with no buildings around and small corrections could be done while moving.

    2. It’s extremely important to plan, check the topography to understand where the signal could bounce and try not to go straight to the initial direction but at least 30 degrees off the last bearing to triangulate.

    3. Without a signal strength meter it would be impossible. The SDR provides precise readings. Attenuators are very important from close range but it would be nice to have more options, maybe 10 db, 20 db and 30 db and not only one 30 db. Best option is to build a decent one. 

    4. Instead of using our body as shields, a better solution could be to use a can and a mini antenna tuned in the 3rd harmonic (fox frequency X 3 => 146.565 * 3 = 469.695 MHz).

    Some ideas to be tested: 

    Overall, it was a great experience. From building directional antennas to training navigation skills, this simple and fun experience will test your abilities. We are ready for the next one! 

    Best reference to learn more about Fox Hunts: http://www.homingin.com/

    Special thanks to Jerry, WB2GZL. He idealized, gave us all the guidance, hid the fox and helped us every step of way!  

    73s

    KD2WWU

  • Meshtastic

    Meshtastic

    Meshtastic is an open-source, low-cost, long-range, and secure mesh networking platform that has been gaining popularity among technology enthusiasts and outdoor adventurers. This platform enables people to create decentralized, private, and resilient wireless networks that can operate without the need for centralized infrastructure or internet connectivity. In this article, we will explore what Meshtastic is, how it works, and why it matters. NO license needed!

    What is Meshtastic?

    Meshtastic is a software and hardware platform that allows users to create a mesh network using off-the-shelf hardware and open-source software. The platform uses the LoRa (Long Range) radio technology to enable long-range, low-power, and low-cost wireless communication between devices. The devices can communicate with each other directly, forming a decentralized network that can operate in remote areas, without internet connectivity.

    The platform includes both hardware and software components. The hardware includes small, battery-operated devices that can be carried by users, such as backpackers, hikers, or bikers. These devices are called Meshtastic nodes and are equipped with GPS, Bluetooth, and LoRa radios. The software includes a mobile application that users can install on their smartphones to interact with the nodes and other users on the network.

    How does Meshtastic work?

    Meshtastic nodes communicate with each other using the LoRa radio technology, which enables long-range communication with minimal power consumption. The nodes can transmit data to other nodes directly, or they can relay the data to other nodes until it reaches the intended recipient. This means that the network can adapt to changing conditions, such as node movement or obstacles, and still maintain connectivity.

    The nodes can transmit and receive different types of data, such as text messages, GPS coordinates, and sensor readings. The mobile application provides a user-friendly interface for users to send and receive messages, view maps, and configure the nodes. The application also includes a feature that allows users to send emergency messages that can be broadcasted to all nodes on the network.

    The platform uses end-to-end encryption to ensure that all data transmitted on the network is secure and private. This means that only the intended recipient can decrypt and read the messages. The platform also includes a feature that allows users to create private groups, which can only be accessed by members with the correct encryption keys.

    Why does Meshtastic matter?

    Meshtastic is an innovative platform that has the potential to transform how people communicate and stay connected in remote areas. The platform enables users to create decentralized networks that are resilient, private, and secure. This can be especially important for outdoor adventurers, such as hikers or backpackers, who may not have access to internet connectivity or reliable cell phone coverage.

    Meshtastic can also be used in other contexts, such as disaster relief, where traditional communication infrastructure may be unavailable or damaged. The platform can enable first responders and volunteers to quickly establish communication networks to coordinate relief efforts and provide assistance to those in need.

    Finally, Meshtastic is an open-source platform, which means that anyone can contribute to its development and improvement. This can lead to the creation of new features, applications, and use cases that can further expand the platform’s capabilities and impact.

    Conclusion

    Meshtastic is an innovative platform that enables users to create decentralized, private, and secure wireless networks using off-the-shelf hardware and open-source software. The platform uses the LoRa radio technology to enable long-range communication with minimal power consumption, and includes a mobile application that provides a user-friendly interface for users to interact with the network. Meshtastic has the potential to transform how people communicate and stay connected in remote areas, and can be used in various contexts, such as disaster relief. The platform’s open-source nature also makes it a collaborative effort that can lead to further expansion and improvement.

    Meshtastic node map: https://canvis.app/meshtastic-map

    WEARC is working to develop a Meshtastic net in Essex County and we can help you with your ham radio or Meshtastic projects. Contact us: admin@wearc.org. Become a member or just enjoy our online content.

    73,

    KD2WWU 

  • AREDN

    AREDN

    Amateur Radio Emergency Data Network (AREDN) is a mesh networking solution that utilizes amateur radio frequencies for communication. This technology provides a versatile and reliable solution for emergency communications during natural disasters or other emergency situations.

    Ham radio operators have long been involved in emergency communication efforts, providing a means of communication when traditional communication methods fail. AREDN takes this concept to the next level by creating a mesh network that allows multiple nodes to communicate with each other, even if they are not within direct line-of-sight.

    AREDN operates on amateur radio frequencies that are reserved for non-commercial use. This means that it can be used without requiring licensing from the Federal Communications Commission (FCC), as long as it is being used for emergency communication purposes.

    One of the key benefits of AREDN is its ability to create a self-healing network. This means that if one node in the network goes down or is destroyed, the other nodes can automatically reroute traffic to maintain communication. This makes AREDN an ideal solution for emergency response teams, as it can provide communication even in the most challenging conditions.

    AREDN is also highly customizable, allowing users to tailor the network to their specific needs. For example, nodes can be set up to prioritize voice or data traffic, depending on the type of communication needed. This flexibility allows AREDN to be used in a wide range of applications, from disaster response to community events.

    One of the challenges of using AREDN is the need for specialized hardware. Nodes must be equipped with compatible hardware and antennas to communicate with each other. However, once the network is set up, it provides a reliable and versatile communication solution that can be used in a variety of situations.

    AREDN is also open source, meaning that the code is freely available for anyone to use and modify. This allows for a community-driven development process that can lead to new features and capabilities being added over time.

    Overall, AREDN is a valuable tool for ham radio operators and emergency response teams. Its ability to create a self-healing mesh network provides a reliable and flexible communication solution that can be used in a variety of emergency situations. While it does require specialized hardware, the benefits of AREDN make it a worthwhile investment for those involved in emergency communication efforts.

    At WEARC we have members highly involved in AREDN that can help you achieve your goals and have fun developing the net in the Essex County area. Reach out to us via admin@wearc.org right now!

    73,

    KD2WWU