Category: WEARC Blog

  • HOW TO START WITH HAM RADIO

    Starting with ham radio can be an exciting journey into the world of amateur radio communication. Here are the steps you can follow to get started:

    1. Learn About Ham Radio: Familiarize yourself with what ham radio is all about. It’s a hobby that allows licensed operators to communicate with each other using various frequencies and modes. Youtube has great channels that you can watch, check it out!

    2. Study for the License Exam: In most countries, you need to pass a license exam to operate a ham radio legally. Study materials are often available online or through local amateur radio clubs. Topics usually include regulations, operating procedures, and basic electronics.

    3. Find a Local Club or Elmer: Joining a local amateur radio club can be immensely helpful. These clubs often offer classes, exams, and mentoring (sometimes referred to as an “Elmer”) for newcomers. They also provide opportunities to meet experienced operators and learn from their knowledge.

    4. Take the License Exam: Once you feel prepared, take the license exam. The exam typically covers multiple-choice questions on regulations, technical knowledge, and operating practices. Passing the exam grants you a call sign and a license level (which varies by country).

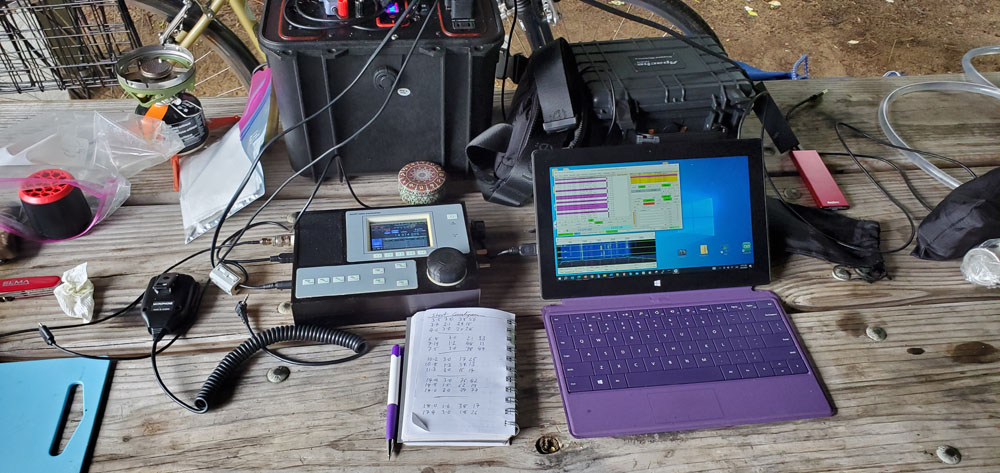
    5. Get Your Equipment: Start with basic equipment appropriate for beginners. A popular choice is a handheld transceiver (HT) that operates on VHF/UHF bands. As you gain experience, you can expand your equipment to include HF bands and more sophisticated setups.

    6. Practice Operating: Start making contacts with other ham radio operators. Join nets (scheduled on-air meetings), participate in contests, or simply chat with other hams. Each contact helps you improve your skills and learn more about the hobby.

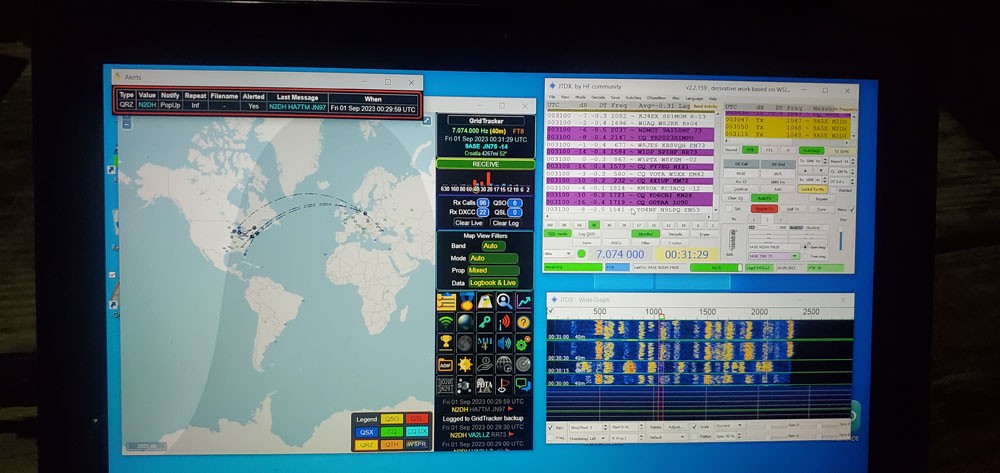
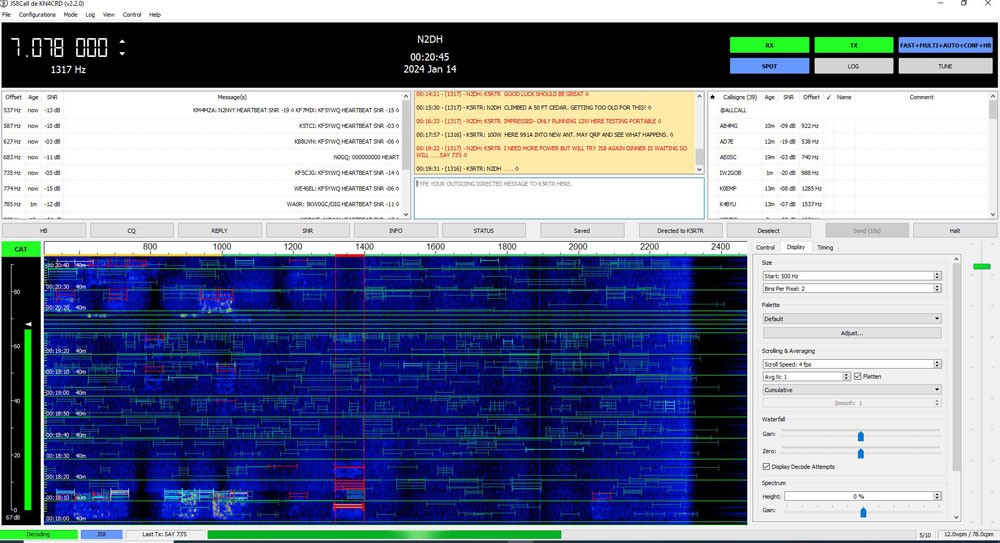
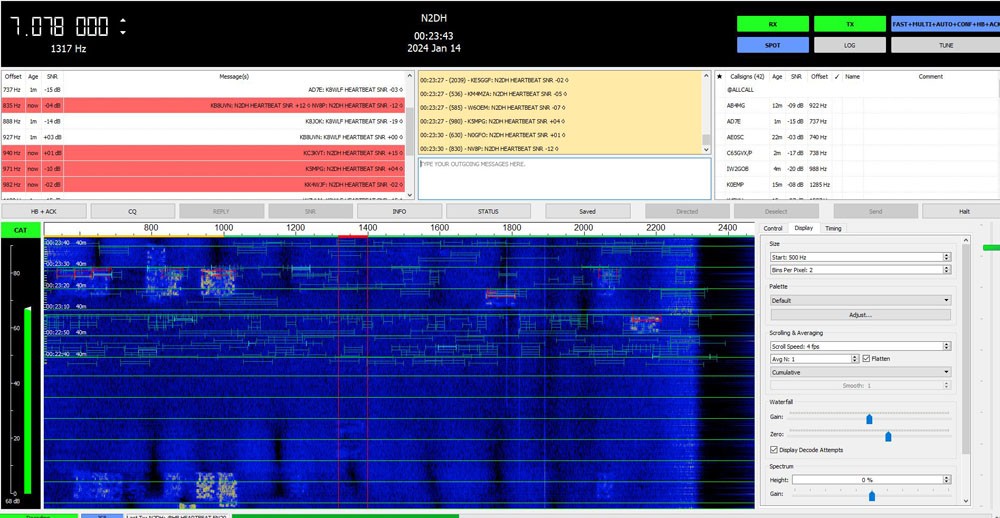
    7. Continue Learning: Ham radio offers a wide range of activities beyond basic voice communication, including digital modes, satellite communication, and even amateur television. Explore these options based on your interests and technical skills.

    8. Contribute to the Community: Many hams enjoy contributing to emergency communications, public service events, or education. Volunteering for these activities not only helps others but also enhances your own skills and network within the ham community.

    9. Upgrade Your License: As you gain experience, consider upgrading your license to gain access to more frequencies and operating privileges. This often involves passing additional exams that cover more advanced topics.

    10. Have Fun and Enjoy the Hobby: Ham radio is a diverse hobby with opportunities for learning, experimentation, and making friends around the world. Enjoy the journey and don’t hesitate to ask for advice or help from fellow hams along the way.

    WEARC is a great group of people that can help you with each step. Subscribe to our blog and reach out in the comments, via Skype, WhatsApp or show up at our meetings. We will always do our best to help you!

    73,

    KD2WWU

  • WEARC & ARC² Gear Up For Field Day

    WEARC & ARC² Gear Up For Field Day

    Club Members from both WEARC and ARC² met at the American Red Cross building in Fairfield, NJ (Essex County) on Saturday June 8 for a final prep for this years ARRL Field Day. 

    Field Day is June 22, 2024 starting at 2pm through June 23, 2024 2pm – Come out and join us and learn more about Amateur Radio For info contact CJ Melhorn (KD2TZX) by e-mail.

  • Field Day – NE2S remote input

    Field Day – NE2S remote input

    While on-site at WEARC Field Day 2024, please take advantage of the temporary remote input for the NE2S repeater in Livingston, NJ which will be available throughout Field Day weekend.  Using the remote input frequency will allow your signal to be full quieting into the repeater while using a HT on low power from our Field Day site.  We will use this repeater to create awareness of our Field Day location and offer talk-in directions and site availability details (hours of operation) upon request.

    Note: there is a small timing delay as a result of VoIP buffers for EchoLink and the end-to-end IP network path; pausing 1/2 second to begin your transmission after hearing the repeater courtesy tone is sufficient to compensate for this delay.

    Standard Repeater Output: 146.595; Standard Repeater Input: 147.595 (+1.00 MHz), 127.3 Hz PL

    Remote Input: 147.445 (+0.85 MHz), 127.3 Hz PL.  Please set your HT to its lowest TX power setting.

  • WEARC and ARC² Scout out Field Day Location

    WEARC and ARC² Scout out Field Day Location

     Over the last month the West Essex Amateur Radio Club and the ARC ² Clubs have been on site at the American Red Cross doing site surveys on where they will set up stations, antennas, and the ever friendly Guests on the Air (GOTA) for field day 2024. 

    The WEARC and ARC² will be operating from the American Red Cross Building for 2024 ARRL Field Day in Fairfield NJ – 209 Fairfield Rd. 

    For more information about field day you click here or contact CJ Melhorn, KD2TZX at kd2tzx{at}arrl.org

    Many ideas and configurations being discussed so the plan is ready to be enacted on Field Day 2024.

    Members from WEARC and ARC² working on spotting a location for one of the field day antenna’s.

    Getting the A/D stretched out after being in storage to locate best positioning

    Members spotting a location for an A/D antenna. Working to see if the reach is feasible.

  • ARRL Annual Field Day – June 22 to June 23, 2024

    ARRL Annual Field Day – June 22 to June 23, 2024

    West Essex Amateur Radio Club – Arc² ARRL Field Day Event
    Saturday June 22, 2024 – Sunday June 23, 2024
    209 Fairfield Rd, Fairfield, NJ (Essex County)

    Come out and visit the West Essex Amateur Radio Club along with Arc² at the American Red Cross building in Fairfield, NJ (Essex County) when our amateur radio operators participate in the most popular on-the-air even held annually in the U.S and Canada. Field Day is a time where many aspects of amateur radio come together to highlight our many roles. Field Day has a variety of purposes, many clubs use it as a social event while contesting, and others will practice their emergency communications.

    WEARC and ARC² will be welcoming amateur radio operators, the general public, distinguished guest and more throughout the day. We will be running a Guests-on-the-Air station so those who are not licensed operators may sit with one of our members and operator a radio and make contacts around the world. We look forward to this event each year and now in collaboration with ARC² we have a site that provides our members and visitors safety in the event of any foul weather that may come our way.

    If any Boy Scout troops are interested we will have an on-site merit badge counselor during the event. Please co-ordinate with CJ Melhorn, contact info below.

    If you require more information feel free to contact CJ Melhorn (KD2TZX) by e-mail at kd2tzx{at}arrl.net. 

  • Moving the Red Cross Radio Room

    Moving the Red Cross Radio Room

    During a recent emergency drill, Bill, NB1LL, realized the existing Red Cross Ham Operation Radio Room would not be functional during a crisis; it was too small to accommodate the personnel and equipment needed.  As Regional Lead of the American Red Cross New Jersey Region, Ham Operations, he set out to find a more suitable space in the Fairfield, NJ Red Cross Building.  

    Bill found a new office; then he just needed a few hands to help move furniture, radios and wire.  Ed K2BED, Henry KC2WRQ, Jerry WB2GZL and Richard KD2IIX, members from ARC Squared (ARC) an Amateur Radio Club for the volunteers and the staff of the American Red Cross and the West Essex Amateur Radio Club (WEARC) were happy to help.

    Tuesday, March 19th, the team met at the Red Cross Building at 7pm to move the Radio Room.

    Bill had previously located the cable antennas in the ceiling so there’d be no delay in moving them.

    Photo Credit: Jerry Scola

    The cables for the new room.

    Photo Credit: Jerry Scola

     The move took 2 hours and was accomplished in time for Bill to have the new Radio Room available for WinLink Training!

    A ‘shout out’ to Ed K2BED, Henry KC2WRQ, Jerry WB2GZL and Richard KD2IIX for all their efforts! 

    Photo Credit: Jerry Scola

  • Repeater Operational Tips

    Repeater Operational Tips

    The question of how a repeater controller works has come up several times in the past few months. Below are some relevant facts about the operation of a familiar repeater controller. The post that follows will focus on high impact items for repeater users, including specific PL and timing details about our local VHF FM repeater, NE2S, on 146.595 MHz.

    PL (Private Line) / CTCSS
    Continuous sub-audible tone signaling, required to access the repeater. Input PLs help keep unwanted noise and unexpected users from activating the repeater. While an input PL may be passed through the repeater, there is no PL tone generated on the output of NE2S by the repeater, so please keep your receive squelch set to carrier (do not filter on PL/CTCSS) for this repeater system. Setting your radio for carrier squelch will ensure you will be able to hear the Courtesy Tone and repeater ID.

    Courtesy Tone
    Following each user’s transmission, the repeater transmitter remains on for a programmable period with a Courtesy Tone provided to indicate that the other use may transmit. On NE2S, the value of this timer is set to 1.5 seconds. The delay to the tone allows other stations to break into the conversation. The period of 1.5 seconds starts when the user unkeys their microphone, and ends once the repeater Courtesy Tone sounds.

    Hang Time
    This is the period where the repeater transmitter remains on the air, after the user input signal goes away and the courtesy tone has sounded. Sometimes Hang Time is referred to as a repeater’s tail. NE2S is configured for 3 seconds of Hang Time after the Courtesy Tone.

    Timeout Timer
    The repeater’s timeout timer is set at 3 minutes on NE2S and its function is to limit transmission duration in case of a continuous carrier at the repeater’s receiver. The timer resets automatically when the input signal at the receiver has ceased for 1.5 seconds. Normally, a Courtesy Tone is generated at that time, however if pending repeater ID is waiting, the repeater ID message will be generated in place of the Courtesy Tone and will be followed by the tone. In either case, the Timeout Timer resets at the beginning of the courtesy tone or pending repeater ID. You do not need to wait for the repeater tail (Hang Time) to drop (end). In order to reset the Timeout Timer, simply wait to hear the Courtesy Tone and begin the next transmission.

    If users do not wait for the Courtesy Tone and the total transmission time between timer resets exceeds the NE2S timeout timer value of 3 minutes, the controller will announce “Repeater Time Out”, and the transmitter will be shut off. When the signal at the input stops for at least 1.5 seconds, the transmitter will be re-enabled and will announce “Repeater Ready” and normal operation will resume.

    Function Value
    Input PL 100.0 Hz
    Output PL None
    Courtesy Tone 1.5 seconds
    Hang Time 3 seconds
    Timeout Timer 3 Minutes
    Output Frequency 146.595 MHz
    Input Frequency 147.595 MHz

    73 & hope to hear you on the repeater soon!

  • Meshtastic Waterproof Device – BEST DESIGN

    Meshtastic Waterproof Device – BEST DESIGN

    Let’s build my version of the LoRa Meshtastic ESP32 device. What do we want to achieve: 

    1. As waterproof as it can be.

    2. No 3D Printed needed.

    3. Battery that can run for a couple days.

    4. Easy USB waterproof connector that can be used for charging.  

    5. ON/OFF switch WITH LED ON/OFF indicator 

    6. High gain antenna.

    Tools needed below (just look at the picture below):

    Parts that you will need: 

    ALL AVAILABLE ON AMAZON! 

    915MHz ESP32 LoRa 0.96 OLED Development Board V3 SX1262 Type-C

    915MHz LoRa Antenna Omni 5dbi Gain SMA Male for ESP32 LoRa OLED Board

    MakerFocus 4pcs 3.7V 3000mAh Lithium Rechargeable Battery 1S 1C Lipo Battery with Protection Board

    mxuteuk 5pcs 12V RV Waterproof Push Button Switch Black ON/Off SPST Switch with 4.52inch Lines for RV/Motorcycle/Car MXU-KP-107

    10PCS USB 3.1 Type C Connector 24 Pins Male Female Plug Socket Receptacle Adapter to Solder Wire & Cable 24P PCB Board Support Module

    VizGiz 10 Pack USB Plug Replacement 4 PIN Type A Female Male Socket Connector Solder Terminal Repair

    DKARDU 6PCS GX16 5 Pins Aviation Connector Male/Female Panel Aviation Wire Connector Plug Socket for Power Connection with 6PCS Waterproof Cover

    Zulkit Junction Box ABS Plastic Dustproof Waterproof IP65 Universal Electrical Boxes Project Enclosure with Fixed Ear Black 3.27 x 2.28 x 1.30 Inch

    DiCUNO 450pcs (5 Colors x 90pcs) 5mm LED Light Emitting Diode Round Assorted Color 

    22 AWG Stranded Wire Silicone Tinned Copper Wire Spool 25ft Each 6 Colors Flexible 22 Gauge Hook up Electrical Wire Kit from Fermerry

    STEP 1 – Case

    Let’s drill the box:

    Mark one of the sides, from lower chanel of the top down, it’s 20mm tall. Do 2 lines, one at 10mm another 7.5mm from the top. The 10mm line is the guide for the switch, the 7.5mm from the top one is for the GX16 5 pin connector. Mark 1 inch from each side crossing the 2 previous lines. 

    With a soldering iron, do some guiding holes. The one on the bottom line 10mm is for the switch, the other one is for the GX16 connector. At the top, mark a place for the antenna SMA connector. We can drill the LED hole in a few.

    Switch is 3/8”, use a step drill for the GX16, 5/8” is the hole size. I used some liquid electrical tape to help with the water proofing. Don’t forget the rubber washer inside of the switch. The SMA connector is a 1/4” and the LED is 3/16”, it’s one of the final holes, in the next section, add where you want. 

    I had to use the soldering iron to remove a post that was in the way of the On/OFF switch. 

    STEP 2 – Soldering connectors

    The GX16 has some numbers. You can do whatever combination of color you want. 

    My setup is: 

    1 – RED (+V) 

    2 – B BRROW/BLACK (Data – )

    3 – Blue (Data +)

    4 – Green (Ground or V-)  

    5 – Nothing, no connection

    4 1/2” should be enough for the the connection between the USBC and the GX16, same for the LED. LED is connected to the 3V and ground pins of the ESP36. 

    For USB-C side I kept the male and female connected just to see better and also to test for wrong connections / soldering bridges between the 4 connectors. ALWAYS check. There should be NO continuity between the 4. 

    STEP 3 –  Final Device assembly 

    Cut one of the battery cables and connect to the switch. Drill the final LED hole 3/16” and use super glue to keep the LED in place. It’s a snug fit and the super glue also helps with the waterproofing.  The way it fits the best is with the ESP32 board below the battery. 

    IMPORTANT: Before connecting the battery, connect the antenna. NEVER turn on the device with the antenna disconnected. Make sure you use the switch off after testing and close everything. Device is done. 

    Almost done… The GX16 cap has a rubber, I added some super glue between the base of the connector and the rubber seal to keep the cap from falling when cap is open.  Screw the lid of the case and it’s done. 

    STEP 4 – USB Cable for Data and Charging

    Use whatever cable with 4 or more wires/conductors. I’m using a Cat 6 POE Ethernet Cable Waterproof Heavy high Speed LAN Network. It’s 4 pairs so I twisted the ends together of each pair. Numbers are in the male connector of the GX16 connector.

    Use plenty shrinking of tube. I used 2 layers begore closing the GC16 connector so the metal part grips the cable well. Also used liquid electrical tape to make sure things stay in place and don’t short in case cable is pulled.   

    1. 5V + (Orange + White with orange Stripe)

    2. Data – (Brown + White with brown stripe)

    3. Data + (Blue + Blue with white stripe)

    4. Ground AKA 5V- (Green + Green with white stripe)  

    TIP: Number the USB male connector: White plastic on top, left to right (1,2,3,4) 

    IMPORTANT:

    DEVICE WILL ONLY CHARGE WHEN ON/OFF SWITCH IS ON so you can connect via USB to charge in a solar panel, power bank or anything else you want. Add a carabiner to hand in your backpack, tree etc. 

    DONE!!!! Congratulations!!! 

    Connect to your computer, go to https://flasher.meshtastic.org/ and flash the most recent stable version of Meshtastic online. 

    IMPORTANT: 

    DEVICE WILL ONLY CHARGE WHEN ON/OFF SWITCH IS ON so you can connect via USB to charge in a solar panel, power bank or anything else you want. Add a carabiner to hand in your backpack, tree etc. 

    You are responsible for things you do. Any error, please leave a comment and this remember this is an AMATEUR GUIDE so it’s your responsibility to make sure you don’t do anything stupid. This contains a LITHIUM BATTERY and will be connected to a COMPUTER so there are risks. I’m showing how I did and worked for me, result may be different for you. Don’t cut, drill or burn your fingers, house etc. BE CAREFUL! 

    73

    KD2WWU

  • If you like FT8, perhaps you will love JS8Call

    If you like FT8, perhaps you will love JS8Call

    I got into using FT8 this summer when camping. In 2023 now post COVID I had to adapt to having other campers close by which made it embarrassing to be talking to myself late at night and possibly annoying my fellow campers. I was lucky and able to download all the software and get it running on my laptop during a wet day and then spend the night exchanging contacts using a variant of WSJT-X, JTDX. I improved things by adding GridTracker and spent much of the summer evening working through FT8.  

    Laptop Screen when integrated with GridTracker

    Good as FT8 is, it didn’t satisfy my itch to communicate. It was good at getting to stations, finding out where you could be heard. But just a signal report and location didn’t feel sufficient. I stumbled on a fork of FT8 called JS8-Call. Developed by KN4CRD back at the end of 2019 it takes much of FT8 but adds texting. So, you can now have a QSO, although slowly. To quote KN4CDR “JS8Call is an experiment in combining the robustness of FT8 (a weak-signal mode by K1JT) with a messaging and network protocol layer for weak signal communication.” This code base is well supported (for Ham software) and has a last release of June 2020. There is an active community with sufficient activity to be able QSO most of the time.

    The user interface and operation of JS8Call is different than FT8. They look quite different, but I quickly got used to the new layout. Before writing this blog, I went on air to get some typical screen captures to share what I like about it and why I feel it important to share availability of this digital mode.

    The top things I really like are:

    • You can send and receive text messages and so exchange type of rig, antenna, power and such. You also have a chance to spend as long as you both like chatting.
    • There is an automated heartbeat mode where you can send automated messages and get replies including your signal strength.

    Main disappointment so far

    No automatic link into GridTracker, although might be possible with some work.

    JS8Call screen during a QSO

    The picture above shows the main screen, you will see that it has the waterfall of activity, above on the left is a list of activities, in the middle you can see the text messages for the current QSO and to the right a list of stations heard. The setup required all the same information as FT8, and I used my radio USB for audio and CAT commands for control. It has interfaces to a central logging program and can be configured for various unattended auto replies as well as full manual operation. It has become something I leave on in the shack and get satisfaction looking where I am being heard.

    JS8Call screen response to a heartbeat

    This second screen capture shows the responses to an automated heartbeat, you can see a bunch of people responded to my heartbeat with a signal strength. I like this feature as it gives me confidence everything is working.

    The system has interesting features a club might want to explore. You can define groups, say the WEARC Group, then messages can be filtered and sent to the group and the group could automatically reply with the heard signal strength.There are also special groups with some set operating periods all designed for interfacing to APRS Packet network. 

    Most of my operation was portable and so I was not as experimental as I am back here in the Shack. I want to look at the different modes available as some are faster (less weak signal capable) also try out the many shortcut messages and options which might make it simpler to cover the more standard messages and questions.

    If I had to sum up what JS8Call feels like in one short sentence, it would be modern day CW mode, since JS8Call has almost the same message speed and probably works in harsher signal conditions.

    I hope a few more club members try this and perhaps we can form our own group able to get automated signal measurements on the major bands between us all.

    Please comments welcome.

  • Blind Mic Test

    Blind Mic Test

    I believe most hams have the same question as I did. Does it pay to spend a lot of money on a high quality microphone? This question bugged me for quite some time so I decided to do something about it. I came up with the idea of doing a blind mic test with several different mics on the air. I used the following mics in the test (with their approximate retail value): 

    1 – Electro Voice RE-320 Broadcast Mic ($300.00)

    2 – Shure SM58 Vocal Mic ($100.00)

    3 – AKG D8000M Vocal Mic ($50.00)

    4 – Heil HM10XD Communications Mic ($140.00)

    5 – Kenwood MC60A Communications Mic ($160.00)

    Starting with the most expensive mic, the Electro Voice, this mic is designed for broadcast applications. It is a less expensive version of the RE-20, which is probably the most popular mic used in broadcast radio stations and podcasts. The RE-320 has the “Dual Personality” EQ switch which can be set to flat or kick drum. When the EQ is set to the kick drum position, the bass begins to roll off at around 800 Hz. The overall frequency response is 30 – 18,000 Hz in the kick drum mode and 45 – 18,000 Hz in the standard mode.

    The second mic used in the test was the Shure SM58. This mic is arguably the most popular vocal mic on the market. The Shure mic is famous for three basic attributes, quality, consistency, and durability. It is popular with music groups as well as many performing artists that need a handheld mic. The overall frequency response of this mic is 50 – 15,000 Hz.

    The third mic in the challenge is an inexpensive vocal mic by AKG, the D8000M. This mic shows great specs for the money with an overall frequency response of 40 – 20,000 Hz. I have used this mic for recording live music and it did a great job. I found it to be impressive for the money.

    The fourth mic used in this comparison was the Heil HM10XD. This mic is specifically built for ham radio. This mic includes two elements. The HC-5X is used when the two position switch is set to the wide mode. The HC-4X is used for the narrow mode. When the mic is in the narrow mode, it has a +10 dB rise at 2,500 Hz which Heil claims will help punch through the pile ups. In the wide mode, the rise at 2,500 Hz is +6 dB which Heil says makes rag chewing more pleasing. The overall frequency response in the wide range is 300 – 8,000 Hz and 600 – 6,000 Hz in the narrow range.

    The fifth and final mic in the test was the Kenwood MC60A. Although this mic has a switchable preamp, the entire test was done with the preamp on and low impedance. The overall frequency response of the Kenwood using the attributes as mentioned is 200 – 7,000 Hz.

    Several hams helped me with this project. I would like to thank Benett, AC2NI, John, N2HMM, Rich, KD2WJR, and Bob W2FKG. All of the tests were conducted in the HF bands including 80, 40 and 10 meters. The radio used was my Kenwood TS890S and the built in equalizer was kept flat for the entire test. The only adjustment made was increasing the gain for the Heil mic as it was substantially lower in output than all of the other mics.

    Here is some of the feedback I received:

    Electro Voice RE-320

    • Sounds fuller with EQ off
    • May not be good for DX
    • Sounds fuller than the other mics
    • Lows are stronger than highs
    • Lower mid and high end
    • Mids increased when EQ is on
    • Sounds more like my voice in real life with EQ on

    Shure SM58

    • The EV was more broadcast quality
    • The Shure sounded better for communication
    • Sounds like the RE-320 with the EQ on
    • Feels brighter, just sounds better overall

    AKG D8000M

    • Identical comments of the Shure SM58
    • Sound like the RE-320 with EQ off but more bass
    • Hard to tell the difference compared to the SM58

    Heil HM10XD Wide Mode

    • Sound tinny
    • Much lower output than the others
    • Not a full sound
    • May be good for DX
    • Punchy on high end
    • Harsh, no lows, very tinny
    • Very low gain

    Heil HM10XD Narrow Mode

    • Lower level than wide
    • Less bass
    • Audio sound pinched
    • All highs, no lows, very tinny
    • Very low gain

    Kenwood MC60A

    • Well rounded sound
    • Full sound
    • Pleasant to listen to
    • Sounds a bit like it is in a cave

    After listening to all the comments, it left me wondering, does it pay to buy an expensive mic? I am not sure it does. I tend to think you can make enough adjustments to the mic using the radio’s (or external) EQ. You be the judge. Here are some sound bits of the mics tested. 

    Electro Voice RE-320 EQ Off

    Electro Voice RE-320 EQ On

    Electro Voice RE-320 EQ Off Then On

    Shure SM58

    AKG D8000M

    Heil HM10XD Wide

    Heil HM10XD Narrow

    Kenwood MC60A

     After listening, please add your comments below.